
标签:COMET,SPACES 由 Comet 团队贡献
在本指南中,我们将演示将 Gradio 与 Comet 结合使用的一些方法。 我们将介绍将 Comet 与 Gradio 结合使用的基础知识,并向你展示一些可以利用 Gradio 的高级功能(例如嵌入 iFrame和状态)来构建一些令人惊叹的模型评估工作流程的方法。
In this guide we will demonstrate some of the ways you can use Gradio with Comet. We will cover the basics of using Comet with Gradio and show you some of the ways that you can leverage Gradio's advanced features such as Embedding with iFrames and State to build some amazing model evaluation workflows.
以下是本指南中涵盖的主题列表。
Here is a list of the topics covered in this guide.
将 Gradio UI 记录到你的 Comet 实验中
Logging Gradio UI's to your Comet Experiments
将 Gradio 应用程序直接嵌入到你的 Comet 项目中
Embedding Gradio Applications directly into your Comet Projects
将 Hugging Face Spaces 直接嵌入到你的 Comet 项目中
Embedding Hugging Face Spaces directly into your Comet Projects
将模型推断从 Gradio 应用程序记录到 Comet
Logging Model Inferences from your Gradio Application to Comet
Comet是一个 MLOps 平台,旨在帮助数据科学家和团队更快地构建更好的模型! Comet 提供工具来在一个地方跟踪、解释、管理和监控你的模型! 它适用于 Jupyter 笔记本和脚本,最重要的是它是 100% 免费的!
Comet is an MLOps Platform that is designed to help Data Scientists and Teams build better models faster! Comet provides tooling to Track, Explain, Manage, and Monitor your models in a single place! It works with Jupyter Notebooks and Scripts and most importantly it's 100% free!
首先,安装运行这些示例所需的依赖项
First, install the dependencies needed to run these examples
pip install comet_ml torch torchvision transformers gradio shap requests Pillow
接下来,你需要注册 Comet 帐户。 设置帐户后, 获取 API 密钥并配置 Comet 凭据
Next, you will need to sign up for a Comet Account. Once you have your account set up, grab your API Key and configure your Comet credentials
如果你将这些示例作为脚本运行,则可以将你的凭据导出为环境变量
If you're running these examples as a script, you can either export your credentials as environment variables
export COMET_API_KEY=""
export COMET_WORKSPACE=""
export COMET_PROJECT_NAME=""
或者将它们设置在工作目录中的 .comet.config 文件中。 你的文件应按以下方式格式化。
or set them in a .comet.config file in your working directory. You file should be formatted in the following way.
[comet]
api_key=
workspace=
project_name=
如果你使用提供的 Colab Notebooks 来运行这些示例,请在启动 Gradio UI 之前使用以下代码片段运行单元格。 运行此单元允许你以交互方式将 API 密钥添加到笔记本中。
If you are using the provided Colab Notebooks to run these examples, please run the cell with the following snippet before starting the Gradio UI. Running this cell allows you to interactively add your API key to the notebook.
import comet_ml
comet_ml.init()
![]()
在此示例中,我们将介绍如何将 Gradio 应用程序登录到 Comet 并使用 Gradio 自定义面板与它们交互。
In this example, we will go over how to log your Gradio Applications to Comet and interact with them using the Gradio Custom Panel.
让我们从使用 resnet18 构建一个简单的图像分类示例开始。
Let's start by building a simple Image Classification example using resnet18.
import comet_ml

import requests
import torch
from PIL import Image
from torchvision import transforms

torch.hub.download_url_to_file("https://github.com/pytorch/hub/raw/master/images/dog.jpg", "dog.jpg")

if torch.cuda.is_available():
    device = "cuda"
else:
    device = "cpu"

model = torch.hub.load("pytorch/vision:v0.6.0", "resnet18", pretrained=True).eval()
model = model.to(device)

# Download human-readable labels for ImageNet.
response = requests.get("https://git.io/JJkYN")
labels = response.text.split("\n")

def predict(inp):
    inp = Image.fromarray(inp.astype("uint8"), "RGB")
    inp = transforms.ToTensor()(inp).unsqueeze(0)
    with torch.no_grad():
        prediction = torch.nn.functional.softmax(model(inp.to(device))[0], dim=0)
    return {labels[i]: float(prediction[i]) for i in range(1000)}

inputs = gr.Image()
outputs = gr.Label(num_top_classes=3)

io = gr.Interface(
    fn=predict, inputs=inputs, outputs=outputs, examples=["dog.jpg"]
)
io.launch(inline=False, share=True)

experiment = comet_ml.Experiment()
experiment.add_tag("image-classifier")

io.integrate(comet_ml=experiment)
此代码段的最后一行会将 Gradio 应用程序的 URL 记录到你的 Comet Experiment。 你可以在实验的文本选项卡中找到该 URL。
The last line in this snippet will log the URL of the Gradio Application to your Comet Experiment. You can find the URL in the Text Tab of your Experiment.
将渐变面板添加到你的实验以与你的应用程序交互。
Add the Gradio Panel to your Experiment to interact with your application.
如果你永久托管 Gradio 应用程序,则可以使用 Gradio Panel Extended 自定义面板嵌入 UI。
If you are permanently hosting your Gradio application, you can embed the UI using the Gradio Panel Extended custom Panel.
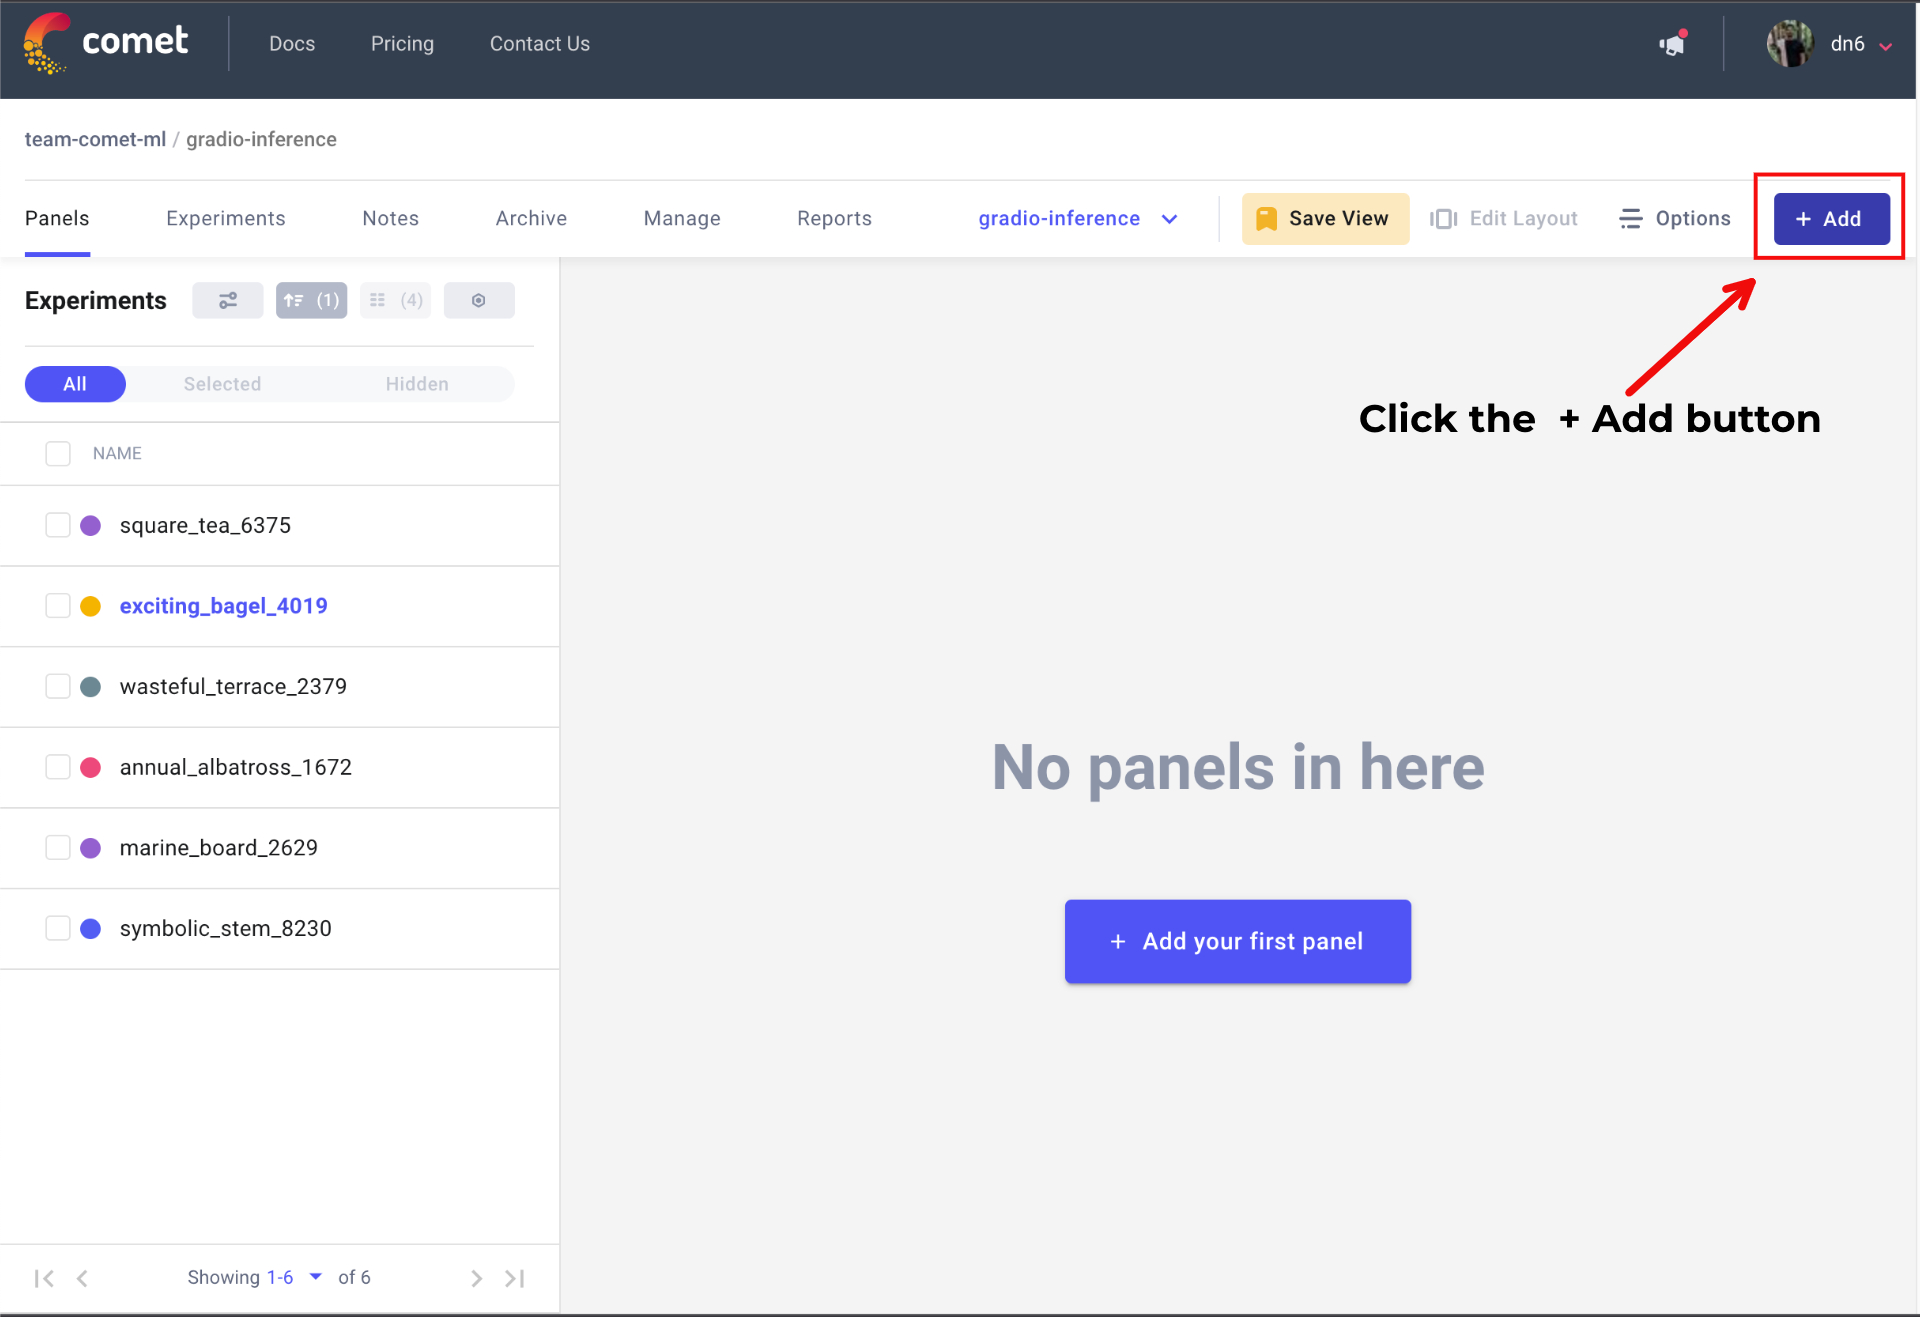
转到你的彗星项目页面,然后转到“面板”选项卡。 单击 + Add 按钮调出面板搜索页面。
Go to your Comet Project page, and head over to the Panels tab. Click the + Add button to bring up the Panels search page.
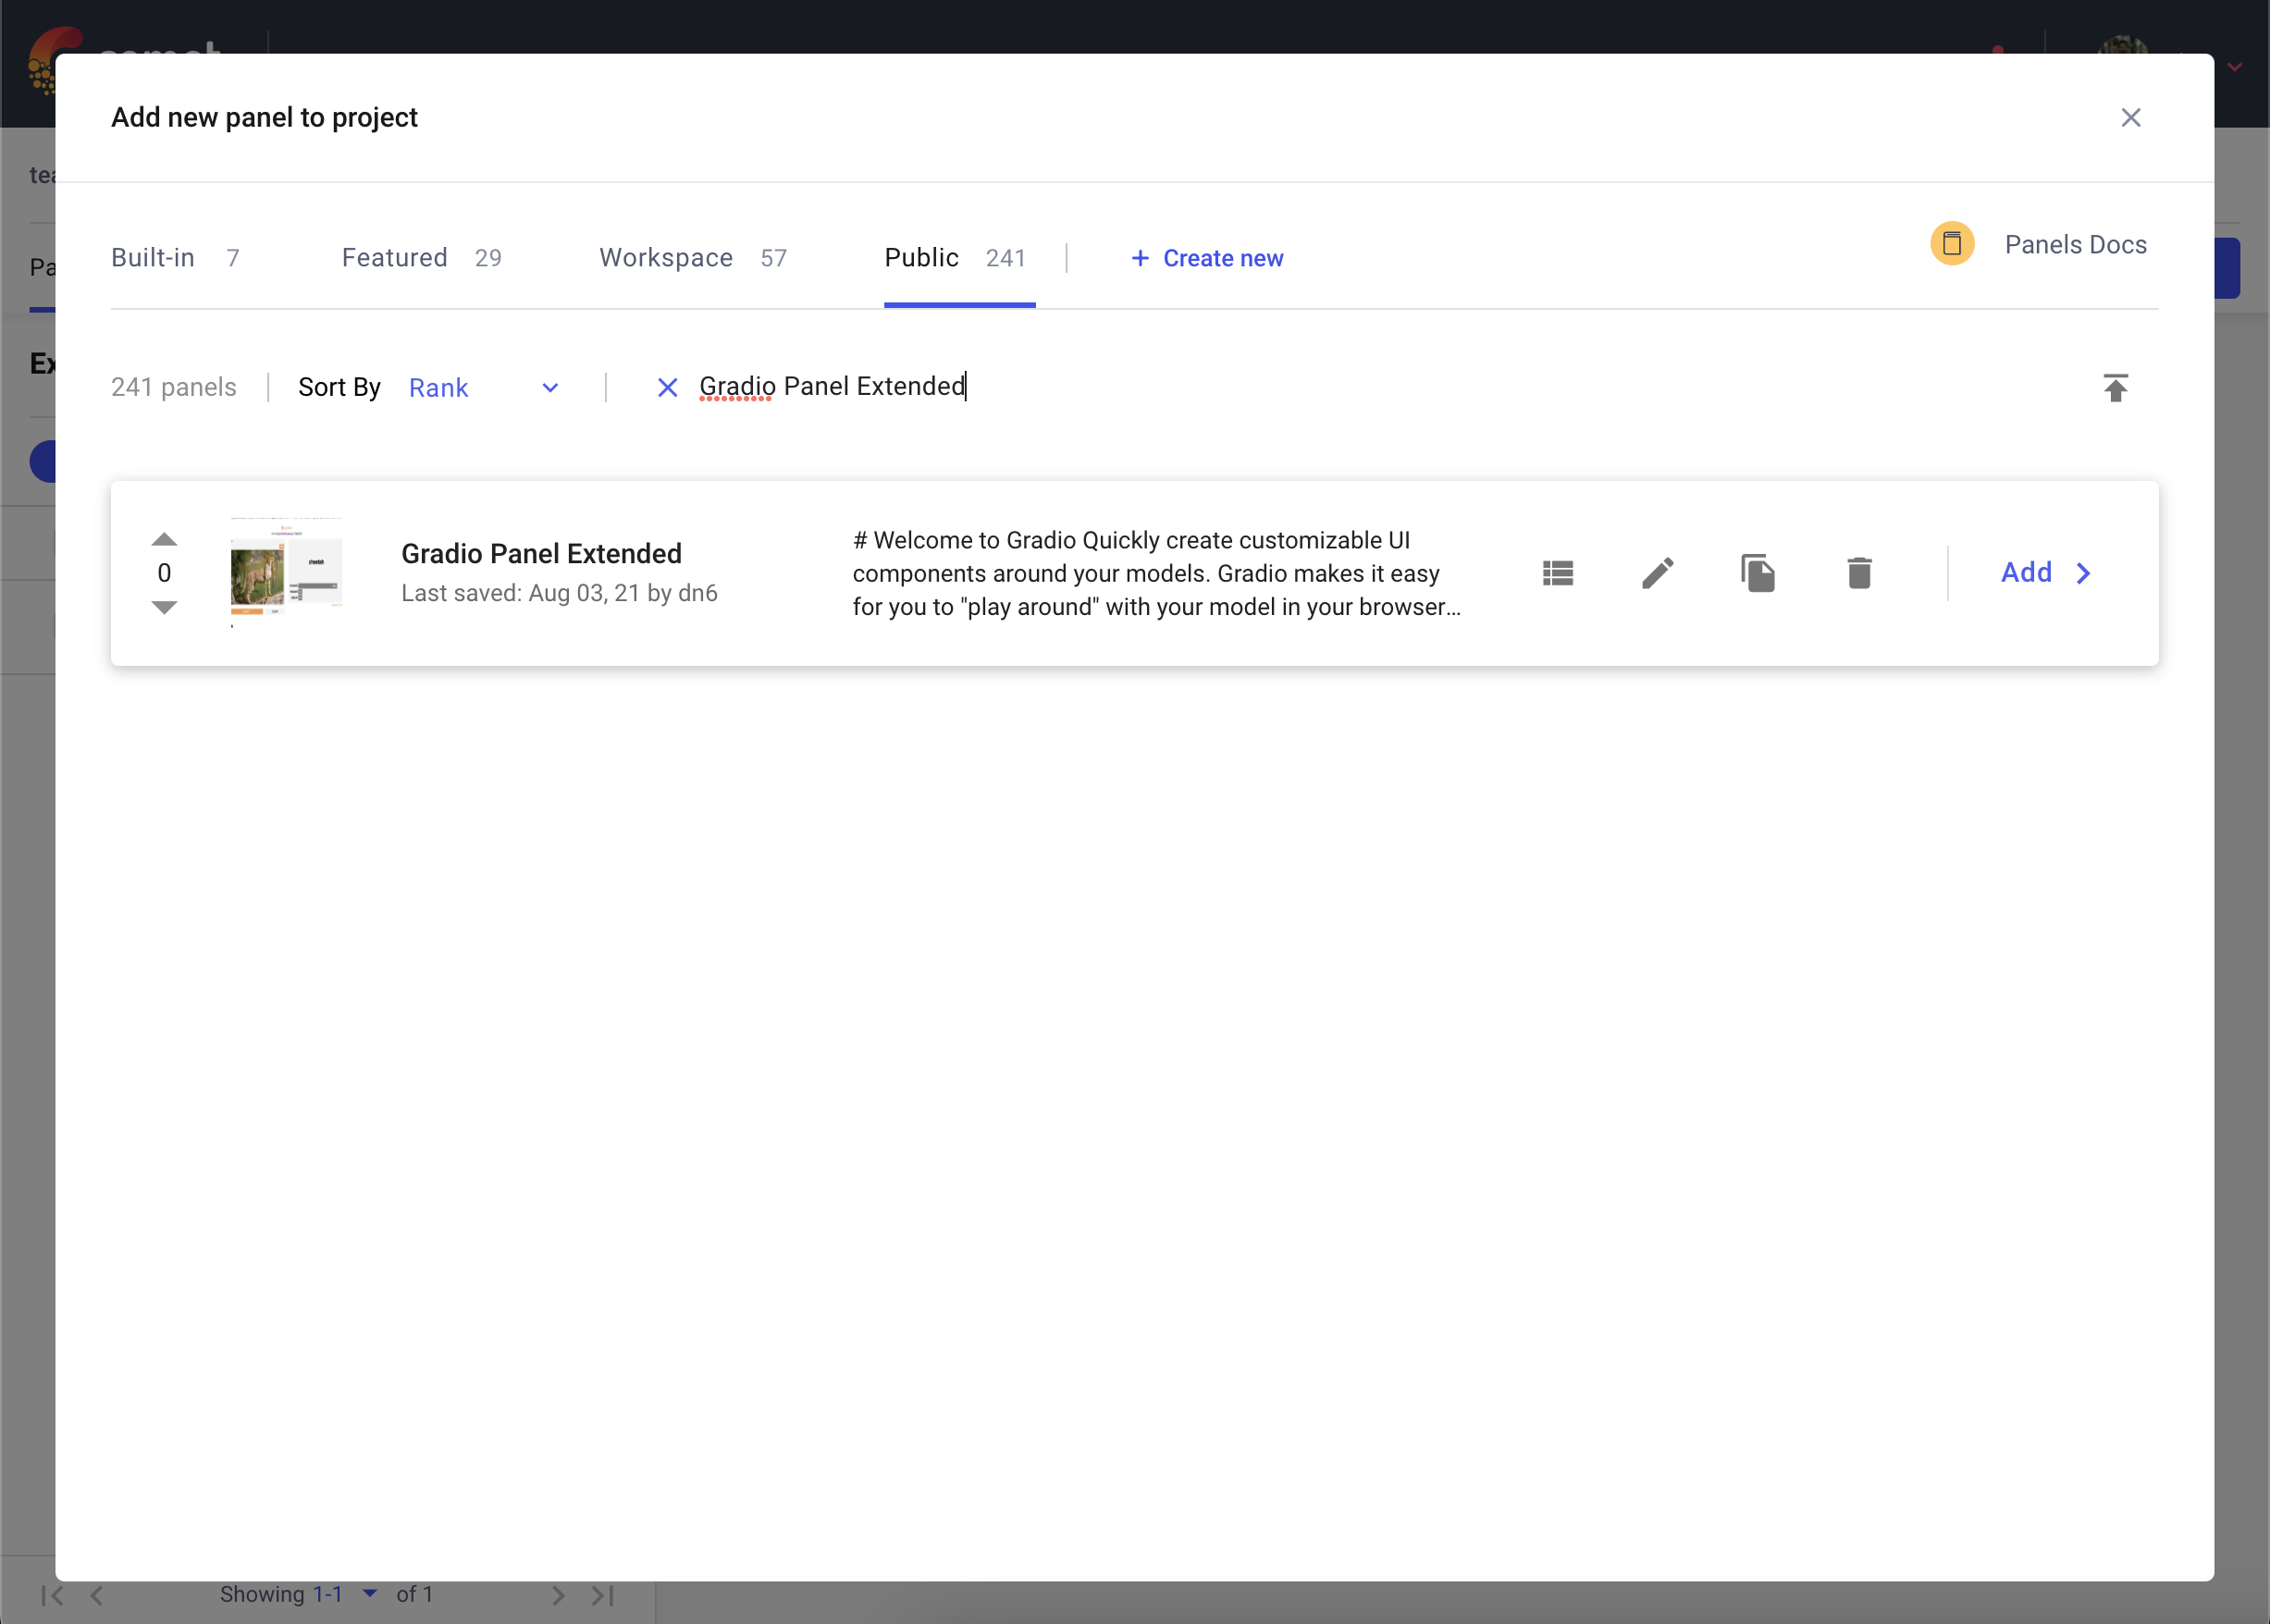
接下来,在 Public Panels 部分搜索 Gradio Panel Extended 并单击 Add 。
Next, search for Gradio Panel Extended in the Public Panels section and click Add.
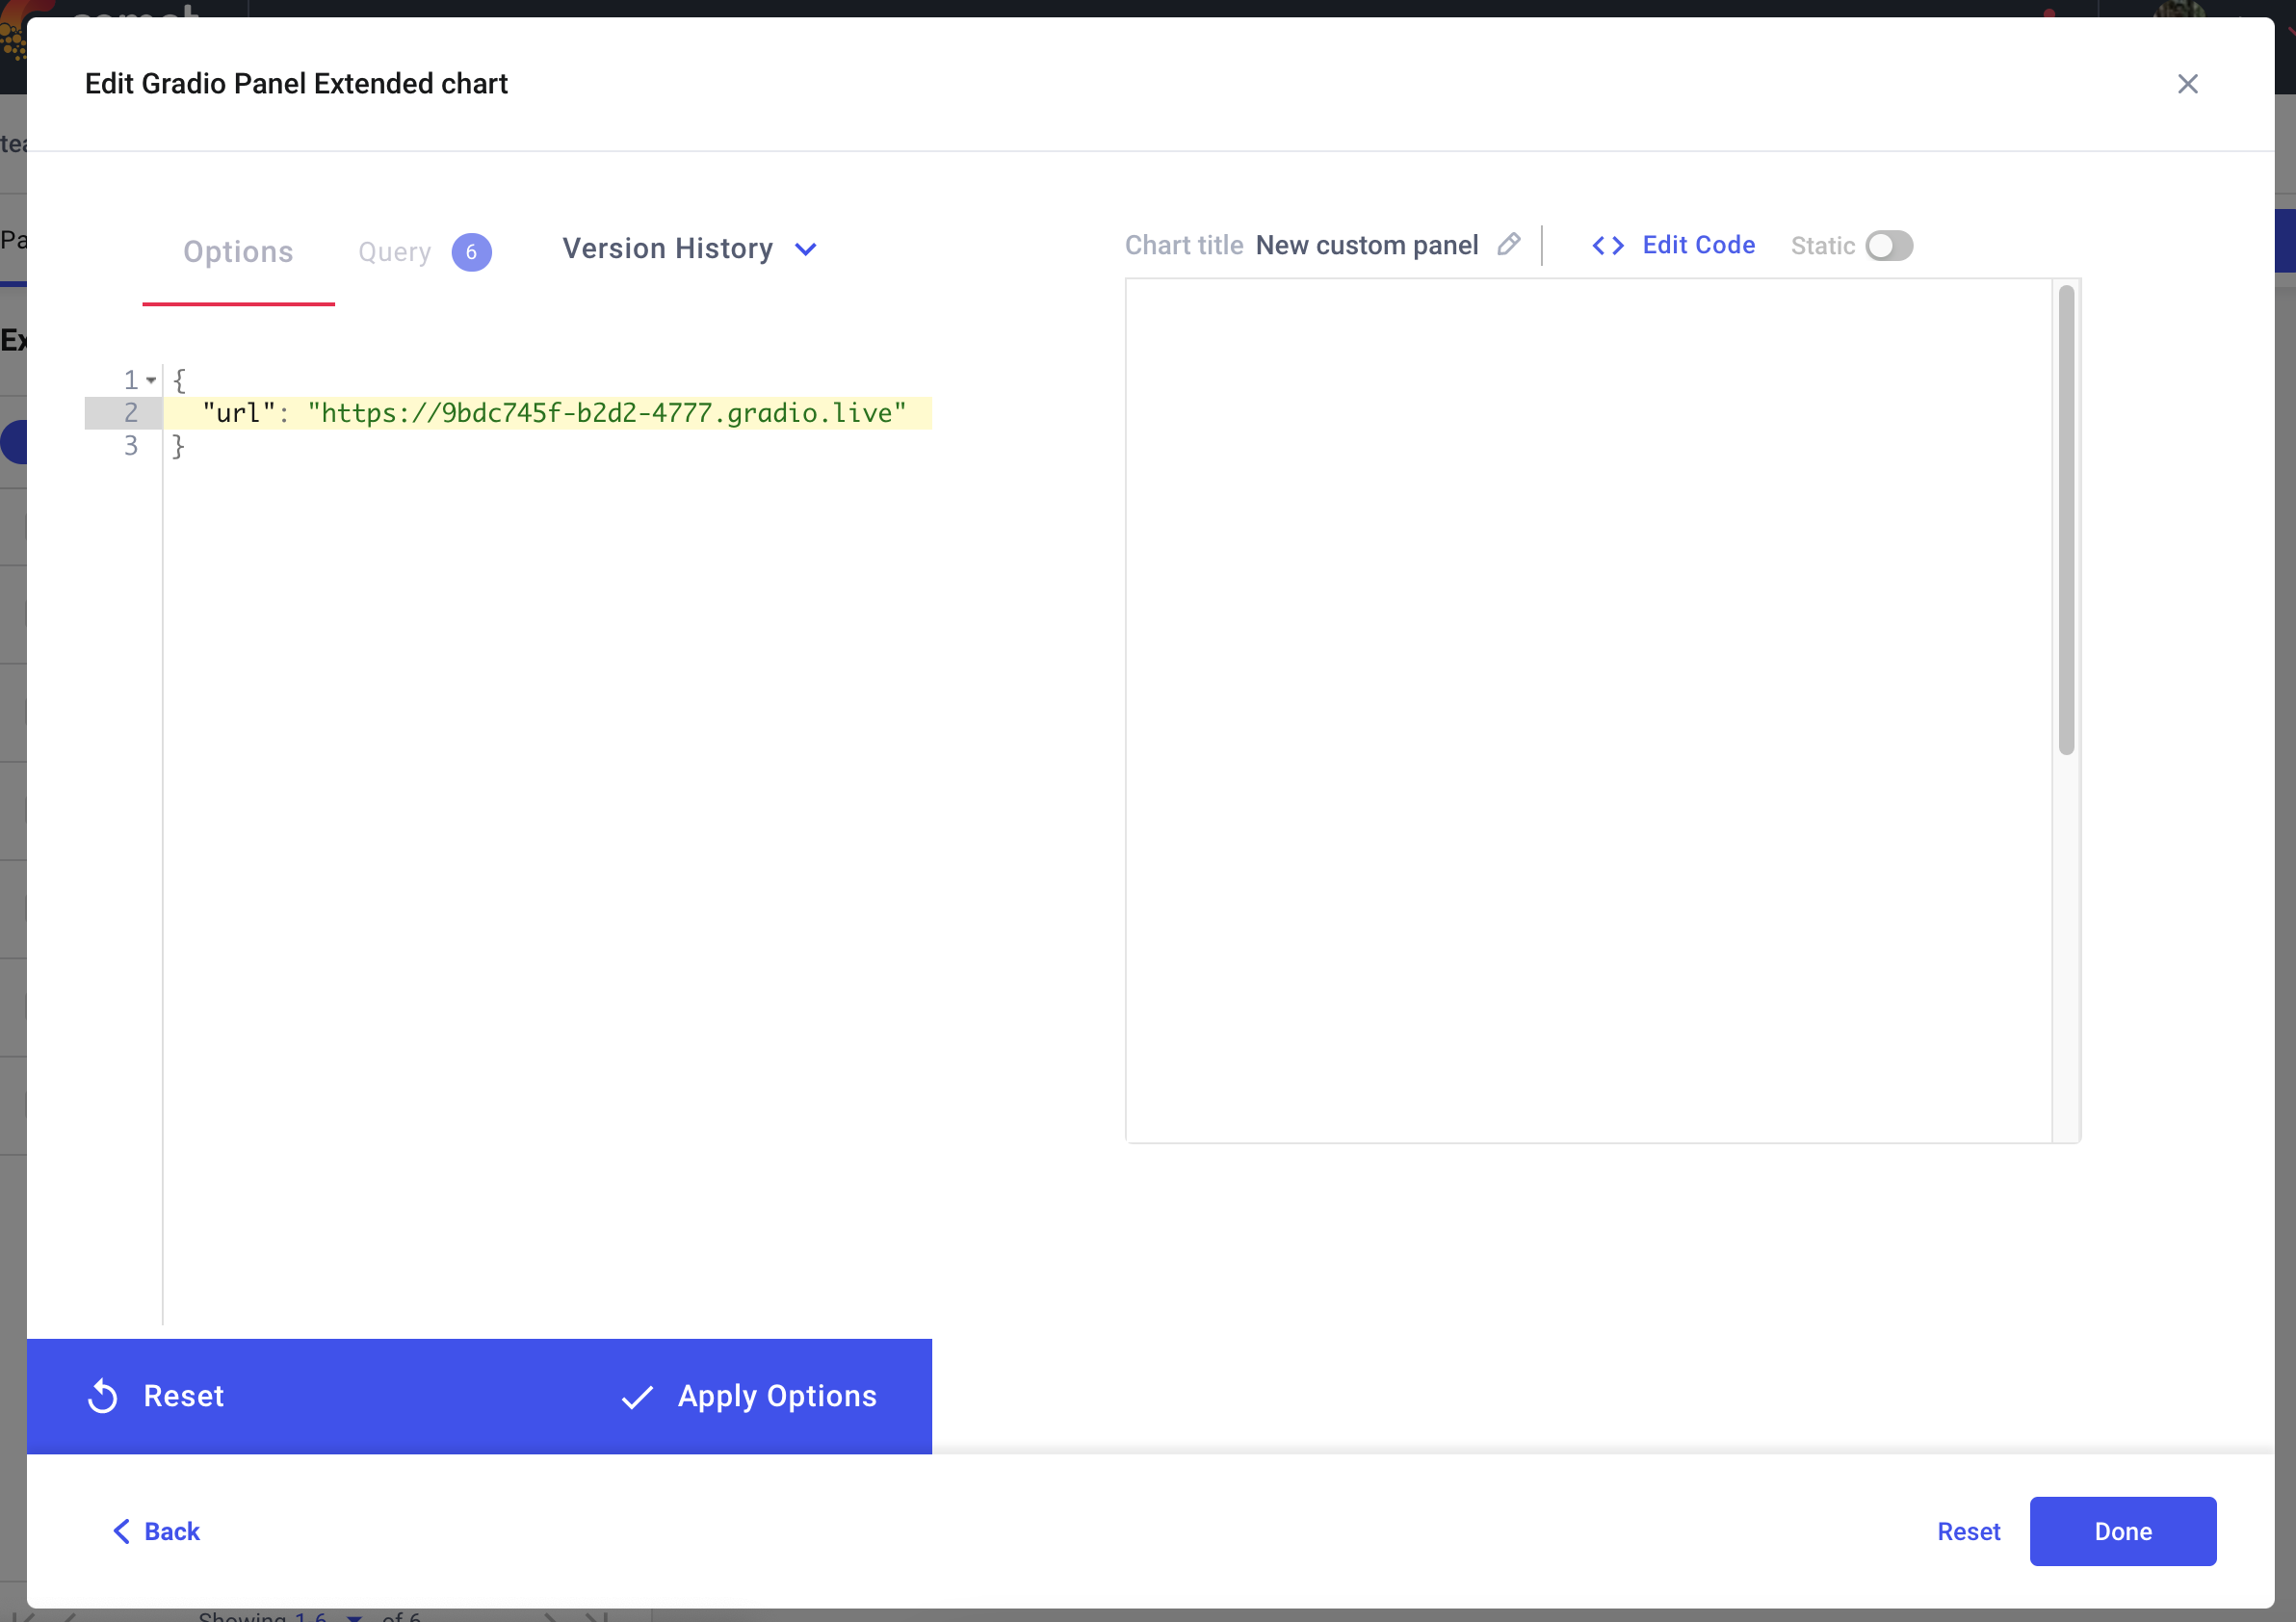
添加面板后,单击 Edit 以访问面板选项页面并粘贴 Gradio 应用程序的 URL。
Once you have added your Panel, click Edit to access to the Panel Options page and paste in the URL of your Gradio application.
你还可以使用 Hugging Face Spaces 面板将托管在 Hugging Faces Spaces 上的 Gradio 应用程序嵌入到你的 Comet 项目中。
You can also embed Gradio Applications that are hosted on Hugging Faces Spaces into your Comet Projects using the Hugging Face Spaces Panel.
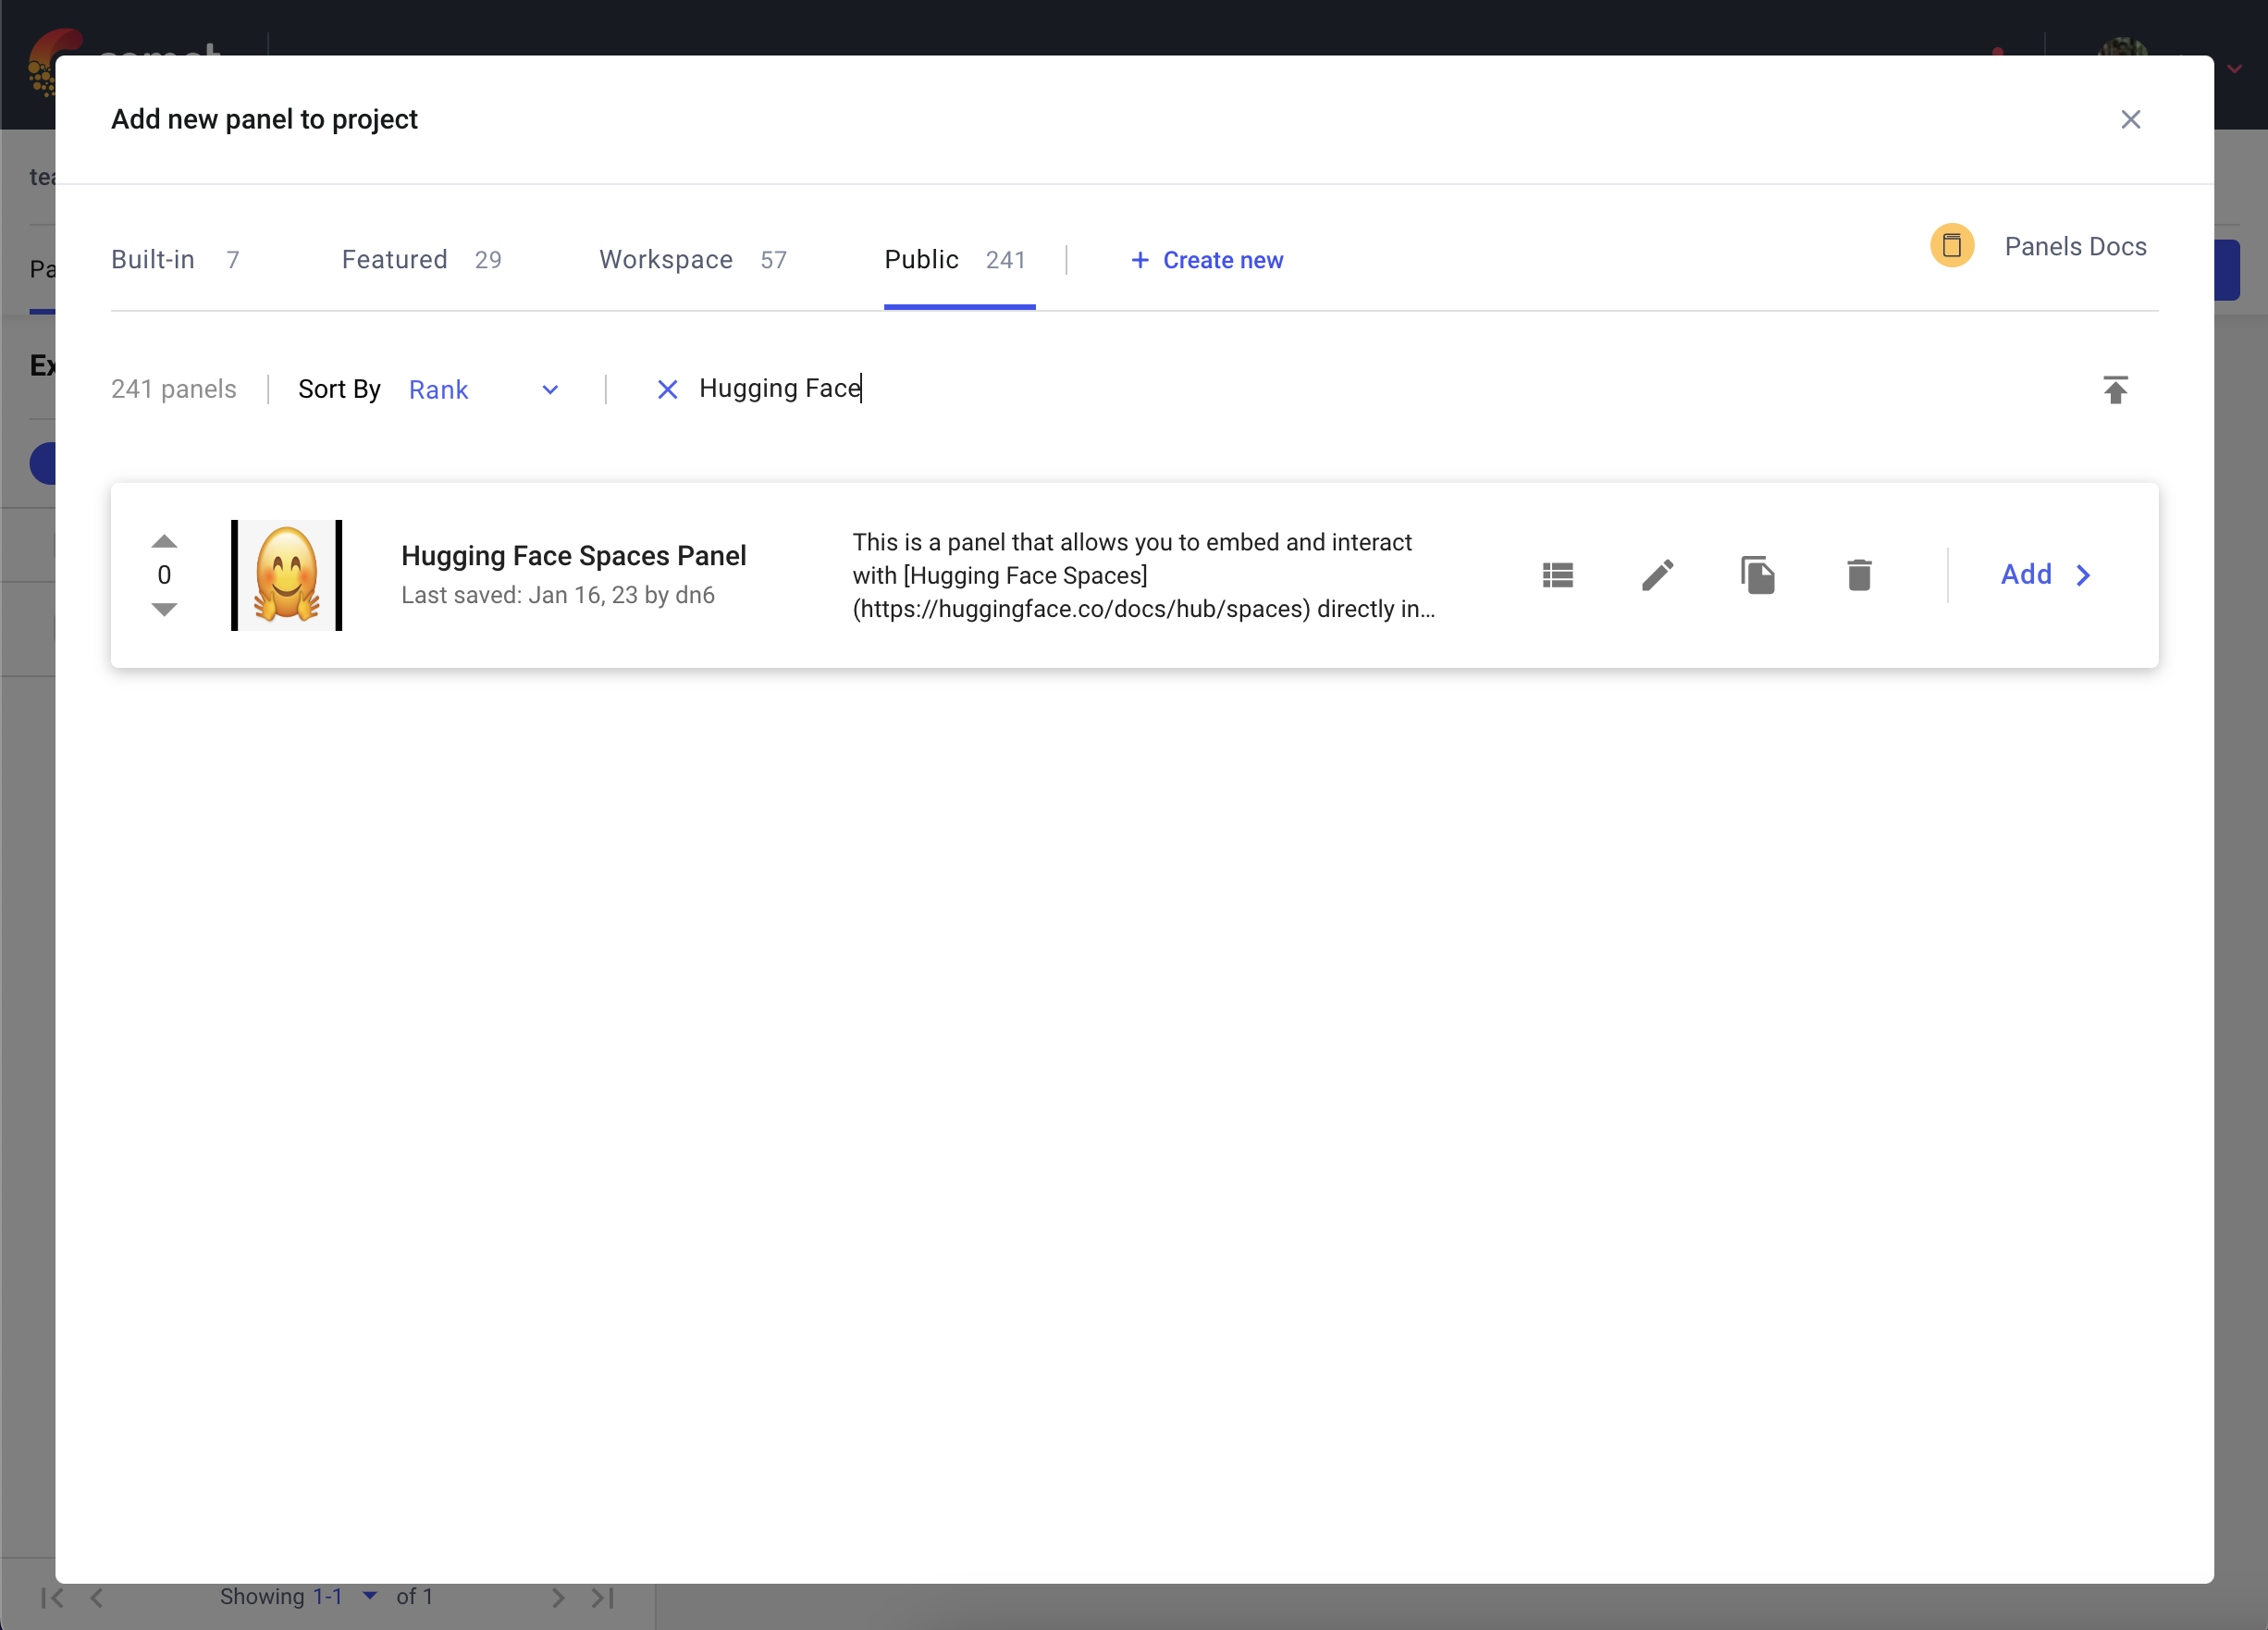
转到你的彗星项目页面,然后转到“面板”选项卡。 单击 + Add 按钮调出面板搜索页面。 接下来,在公共面板部分搜索拥抱面空间面板,然后单击 Add 。
Go to your Comet Project page, and head over to the Panels tab. Click the + Add button to bring up the Panels search page. Next, search for the Hugging Face Spaces Panel in the Public Panels section and click Add.
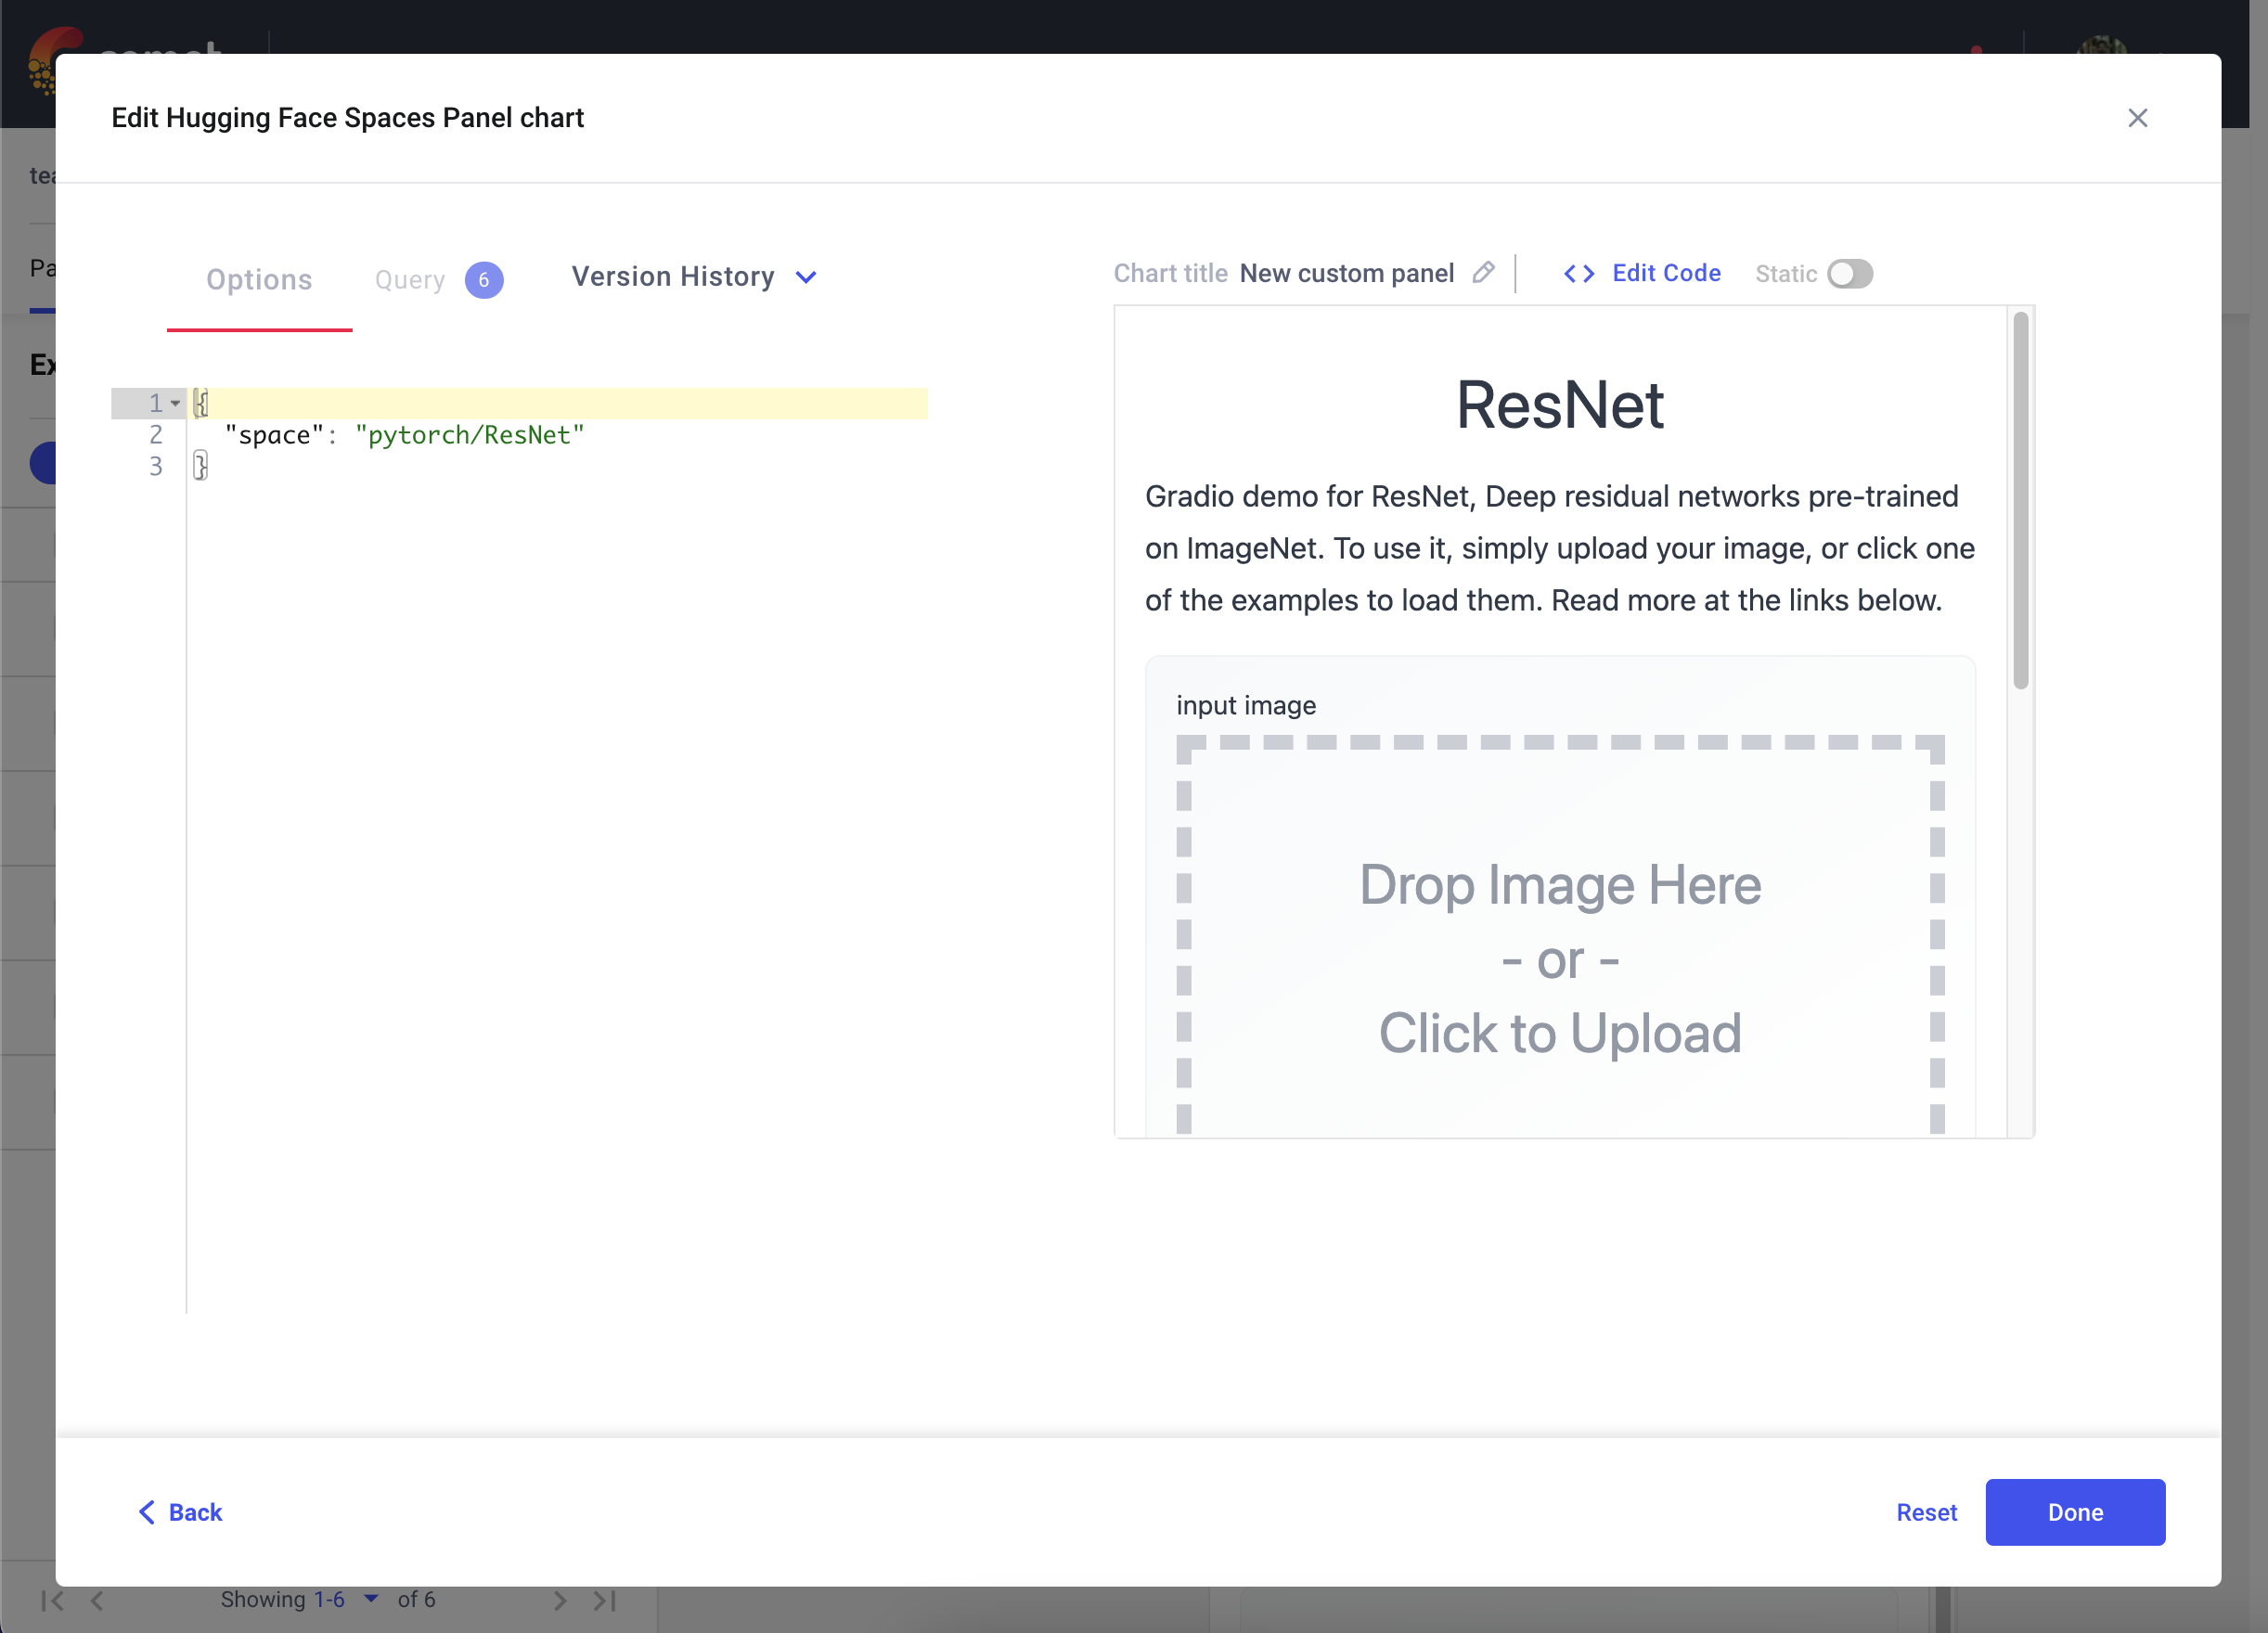
添加面板后,单击编辑以访问面板选项页面并粘贴到拥抱面空间的路径中,例如 pytorch/ResNet
Once you have added your Panel, click Edit to access to the Panel Options page and paste in the path of your Hugging Face Space e.g. pytorch/ResNet
![]()
在前面的示例中,我们演示了你可以通过 Comet UI 与 Gradio 应用程序交互的各种方式。 此外,你还可以将模型推断(例如 SHAP 图)从 Gradio 应用程序记录到 Comet。
In the previous examples, we demonstrated the various ways in which you can interact with a Gradio application through the Comet UI. Additionally, you can also log model inferences, such as SHAP plots, from your Gradio application to Comet.
在以下代码片段中,我们将记录来自文本生成模型的推理。 我们可以使用 Gradio 的State对象在多个推理调用中持久化 Experiment。 这将允许你记录从模型到单个实验的多个推理。
In the following snippet, we're going to log inferences from a Text Generation model. We can persist an Experiment across multiple inference calls using Gradio's State object. This will allow you to log multiple inferences from a model to a single Experiment.
import comet_ml
import gradio as gr
import shap
import torch
from transformers import AutoModelForCausalLM, AutoTokenizer

if torch.cuda.is_available():
    device = "cuda"
else:
    device = "cpu"

MODEL_NAME = "gpt2"

model = AutoModelForCausalLM.from_pretrained(MODEL_NAME)

# set model decoder to true
model.config.is_decoder = True
# set text-generation params under task_specific_params
model.config.task_specific_params["text-generation"] = {
    "do_sample": True,
    "max_length": 50,
    "temperature": 0.7,
    "top_k": 50,
    "no_repeat_ngram_size": 2,
}
model = model.to(device)

tokenizer = AutoTokenizer.from_pretrained(MODEL_NAME)
explainer = shap.Explainer(model, tokenizer)

def start_experiment():
    """Returns an APIExperiment object that is thread safe
    and can be used to log inferences to a single Experiment
    """
    try:
        api = comet_ml.API()
        workspace = api.get_default_workspace()
        project_name = comet_ml.config.get_config()["comet.project_name"]

        experiment = comet_ml.APIExperiment(
            workspace=workspace, project_name=project_name
        )
        experiment.log_other("Created from", "gradio-inference")

        message = f"Started Experiment: [{experiment.name}]({experiment.url})"

        return (experiment, message)

    except Exception as e:
        return None, None

def predict(text, state, message):
    experiment = state

    shap_values = explainer([text])
    plot = shap.plots.text(shap_values, display=False)

    if experiment is not None:
        experiment.log_other("message", message)
        experiment.log_html(plot)

    return plot

with gr.Blocks() as demo:
    start_experiment_btn = gr.Button("Start New Experiment")
    experiment_status = gr.Markdown()

    # Log a message to the Experiment to provide more context
    experiment_message = gr.Textbox(label="Experiment Message")
    experiment = gr.State()

    input_text = gr.Textbox(label="Input Text", lines=5, interactive=True)
    submit_btn = gr.Button("Submit")

    output = gr.HTML(interactive=True)

    start_experiment_btn.click(
        start_experiment, outputs=[experiment, experiment_status]
    )
    submit_btn.click(
        predict, inputs=[input_text, experiment, experiment_message], outputs=[output]
    )
此代码段的推论将保存在实验的 HTML 选项卡中。
Inferences from this snippet will be saved in the HTML tab of your experiment.
我们希望本指南对你有所帮助,并提供一些灵感,帮助你使用 Comet 和 Gradio 构建出色的模型评估工作流程。
We hope you found this guide useful and that it provides some inspiration to help you build awesome model evaluation workflows with Comet and Gradio.
在此处创建 Hugging Face 帐户。
Create an account on Hugging Face here.
在你的用户名下添加 Gradio Demo,请参阅此课程以在 Hugging Face 上设置 Gradio Demo。
Add Gradio Demo under your username, see this course for setting up Gradio Demo on Hugging Face.
在这里请求加入 Comet 组织。
Request to join the Comet organization here.