
相关空间:https: //huggingface.co/spaces/akhaliq/JoJoGAN标签:WANDB、SPACES 由 Gradio 团队贡献
在本指南中,我们将引导你完成:
In this Guide, we'll walk you through:
Gradio 和 Hugging Face Spaces 以及 Wandb 的介绍
Introduction of Gradio, and Hugging Face Spaces, and Wandb
如何使用 JoJoGAN 的 Wandb 集成设置 Gradio 演示
How to setup a Gradio demo using the Wandb integration for JoJoGAN
在将 wandb 上的实验跟踪到 Hugging Face 上的 Wandb 组织后,如何贡献自己的 Gradio 演示
How to contribute your own Gradio demos after tracking your experiments on wandb to the Wandb organization on Hugging Face
这是在 wandb 上训练的模型和跟踪的实验的示例,请尝试下面的 JoJoGAN 演示。
Here's an example of an model trained and experiments tracked on wandb, try out the JoJoGAN demo below.
权重和偏差 (W&B) 允许数据科学家和机器学习科学家在从训练到生产的每个阶段跟踪他们的机器学习实验。 任何指标都可以通过样本进行聚合,并显示在可自定义和可搜索的仪表板的面板中,如下所示:
Weights and Biases (W&B) allows data scientists and machine learning scientists to track their machine learning experiments at every stage, from training to production. Any metric can be aggregated over samples and shown in panels in a customizable and searchable dashboard, like below:
Gradio 允许用户将他们的机器学习模型演示为网络应用程序,所有这些都在几行 Python 中完成。 Gradio 将任何 Python 函数(例如机器学习模型的推理函数)包装到用户界面中,演示可以在 jupyter notebooks、colab notebooks 中启动,也可以嵌入你自己的网站并免费托管在 Hugging Face Spaces 上。
Gradio lets users demo their machine learning models as a web app, all in a few lines of Python. Gradio wraps any Python function (such as a machine learning model's inference function) into a user interface and the demos can be launched inside jupyter notebooks, colab notebooks, as well as embedded in your own website and hosted on Hugging Face Spaces for free.
从这里开始
Get started here
Hugging Face Spaces 是 Gradio 演示的免费托管选项。 Spaces 带有 3 个 SDK 选项:Gradio、Streamlit 和静态 HTML 演示。 空间可以是公共的也可以是私有的,工作流程类似于 github repos。 Hugging Face 目前有超过 2000+个空间。 在此处了解有关空间的更多信息。
Hugging Face Spaces is a free hosting option for Gradio demos. Spaces comes with 3 SDK options: Gradio, Streamlit and Static HTML demos. Spaces can be public or private and the workflow is similar to github repos. There are over 2000+ spaces currently on Hugging Face. Learn more about spaces here.
现在,让我们向你介绍如何自行完成此操作。 出于本教程的目的,我们假设你是 W&B 和 Gradio 的新手。
Now, let's walk you through how to do this on your own. We'll make the assumption that you're new to W&B and Gradio for the purposes of this tutorial.
让我们开始吧!
Let's get started!
创建 W&B 帐户
Create a W&B account
如果你还没有免费帐户,请按照这些快速说明创建你的免费帐户。 它不应该超过几分钟。 完成后(或者如果你已经有一个帐户),接下来,我们将运行一个快速协作。
Follow these quick instructions to create your free account if you don’t have one already. It shouldn't take more than a couple minutes. Once you're done (or if you've already got an account), next, we'll run a quick colab.
打开 Colab 安装 Gradio 和 W&B
Open Colab Install Gradio and W&B
我们将跟随 JoJoGAN 存储库中提供的 colab,并进行一些小的修改以更有效地使用 Wandb 和 Gradio。
We'll be following along with the colab provided in the JoJoGAN repo with some minor modifications to use Wandb and Gradio more effectively.
![]()
在顶部安装 Gradio 和 Wandb:
Install Gradio and Wandb at the top:
pip install gradio wandb
Finetune StyleGAN 和 W&B 实验跟踪
Finetune StyleGAN and W&B experiment tracking
下一步将打开一个 W&B 仪表板来跟踪你的实验,并打开一个 gradio 面板,显示预训练模型,以便从托管在 Huggingface Spaces 上的 Gradio Demo 的下拉菜单中进行选择。 这是你需要的代码:
This next step will open a W&B dashboard to track your experiments and a gradio panel showing pretrained models to choose from a drop down menu from a Gradio Demo hosted on Huggingface Spaces. Here's the code you need for that:
   alpha =  1.0
alpha = 1-alpha

preserve_color = True
num_iter = 100
log_interval = 50
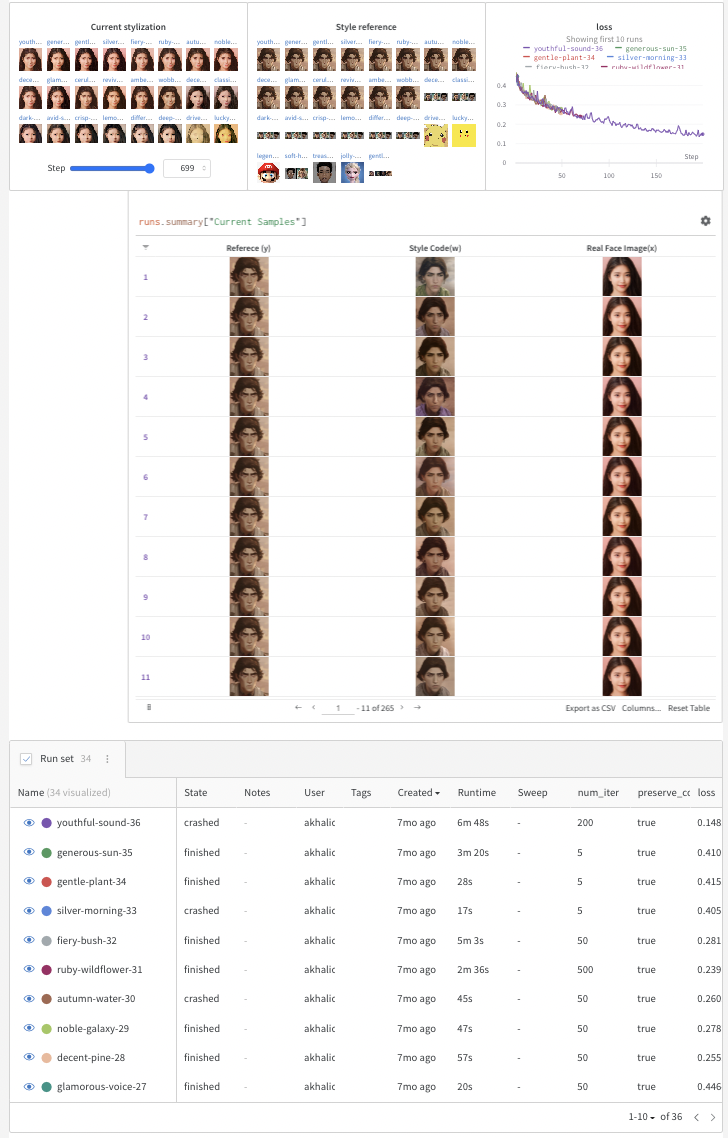
samples = [] column_names = ["Reference (y)", "Style Code(w)", "Real Face Image(x)"]
wandb.init(project="JoJoGAN") config = wandb.config config.numiter = numiter config.preservecolor = preservecolor wandb.log( {"Style reference": [wandb.Image(transforms.ToPILImage()(target_im))]}, step=0)
wandb.init(project="JoJoGAN") config = wandb.config config.numiter = numiter config.preservecolor = preservecolor wandb.log( {"样式参考": [wandb.Image(transforms.ToPILImage()(targetim))][wandb.Image(transforms.ToPILImage()(targetim))] },步骤=0)
discriminator = Discriminator\(1024, 2\).eval\(\).to\(device\)
ckpt = torch.load\('models/stylegan2-ffhq-config-f.pt', map_location=lambda storage, loc: storage\)
discriminator.load_state_dict\(ckpt["d"], strict=False\)
discriminator = Discriminator(1024, 2).eval().to(device) ckpt = torch.load('models/stylegan2-ffhq-config-f.pt', maplocation=lambda storage, loc: storage) 鉴别器.loadstate_dict( ckpt [“d”]["d"] ,严格=假)
del generator
generator = deepcopy\(original_generator\)
del 生成器 generator = deepcopy(original_generator)
g_optim = optim.Adam\(generator.parameters\(\), lr=2e-3, betas=\(0, 0.99\)\)
如果保留颜色:idswap = [9,11,15,16,17][9,11,15,16,17]否则:idswap = list(range(7, generator.n_latent))
if preservecolor: idswap = [9,11,15,16,17] else: idswap = list(range(7, generator.nlatent))
对于 tqdm 中的 idx(范围(numiter)):meanw = generator.getlatent(torch.randn( [latents.size(0),latentdim][latents.size(0), latentdim] ).to(device))。unsqueeze(1)。重复(1,generator.nlatent, 1) inlatent = latents.clone() inlatent [:, idswap][:, idswap] = alpha latents [:, id_swap][:, id_swap] + (1-alpha) meanw [:, idswap][:, id_swap]
for idx in tqdm(range(numiter)): meanw = generator.getlatent(torch.randn([latents.size(0), latentdim]).to(device)).unsqueeze(1).repeat(1, generator.nlatent, 1) inlatent = latents.clone() inlatent[:, idswap] = alphalatents[:, id_swap] + (1-alpha)meanw[:, idswap]
img = 生成器(inlatent,inputis_latent=True)
img = generator(inlatent, inputis_latent=True)
与 torch.nograd(): realfeat = discriminator(targets) fake_feat = discriminator(img)
with torch.nograd(): realfeat = discriminator(targets) fake_feat = discriminator(img)
loss = sum([F.l1loss(a, b) for a, b in zip(fakefeat, realfeat)])/len(fakefeat)
wandb.log({"loss": loss}, step=idx) 如果 idx % loginterval == 0: generator.eval() mysample = generator(myw, inputislatent=True) generator.train() mysample = transforms.ToPILImage( )(utils.makegrid(mysample, normalize=True, range=(-1, 1))) wandb.log( {"当前样式": [wandb.Image(mysample)][wandb.Image(mysample)] }, step=idx) tabledata = [wandb.Image( transforms.ToPILImage()(targetim))、wandb.Image(img)、wandb.Image(mysample)、][ wandb.Image(transforms.ToPILImage()(targetim)), wandb.Image(img), wandb.Image(mysample), ] samples.append(tabledata)
wandb.log({"loss": loss}, step=idx) if idx % loginterval == 0: generator.eval() mysample = generator(myw, inputislatent=True) generator.train() mysample = transforms.ToPILImage()(utils.makegrid(mysample, normalize=True, range=(-1, 1))) wandb.log( {"Current stylization": [wandb.Image(mysample)]}, step=idx) tabledata = [ wandb.Image(transforms.ToPILImage()(targetim)), wandb.Image(img), wandb.Image(mysample), ] samples.append(table_data)
goptim.zerograd() loss.backward() g_optim.step()
outtable = wandb.Table(data=samples, columns=columnnames) wandb.log({"Current Samples": out_table})
from PIL import Image
import torch
torch.backends.cudnn.benchmark = True
from torchvision import transforms, utils
from util import *
import math
import random
import numpy as np
from torch import nn, autograd, optim
from torch.nn import functional as F
from tqdm import tqdm
import lpips
from model import *
from e4eprojection import projection as e4eprojection

from copy import deepcopy
import imageio

import os
import sys
import torchvision.transforms as transforms
from argparse import Namespace
from e4e.models.psp import pSp
from util import *
from huggingfacehub import hfhub_download
from google.colab import files

torch.save({"g": generator.state_dict()}, "your-model-name.pt")

files.download('your-model-name.pt')

latentdim = 512
device="cuda"
modelpaths = hfhubdownload(repoid="akhaliq/jojogan-stylegan2-ffhq-config-f", filename="stylegan2-ffhq-config-f.pt")
originalgenerator = Generator(1024, latentdim, 8, 2).to(device)
ckpt = torch.load(modelpaths, maplocation=lambda storage, loc: storage)
originalgenerator.loadstatedict(ckpt["gema"], strict=False)
meanlatent = originalgenerator.meanlatent(10000)

generator = deepcopy(original_generator)

ckpt = torch.load("/content/JoJoGAN/your-model-name.pt", maplocation=lambda storage, loc: storage)
generator.loadstate_dict(ckpt["g"], strict=False)
generator.eval()

plt.rcParams['figure.dpi'] = 150

transform = transforms.Compose(
    [
        transforms.Resize((1024, 1024)),
        transforms.ToTensor(),
        transforms.Normalize((0.5, 0.5, 0.5), (0.5, 0.5, 0.5)),
    ]
)

def inference(img):

    img.save('out.jpg')

    alignedface = alignface('out.jpg')

myw = e4eprojection(alignedface, "out.pt", device).unsqueeze(0)

    with torch.nograd():
        mysample = generator(myw, inputislatent=True)

npimage = my_sample[0].cpu().permute(1, 2, 0).detach().numpy()
    imageio.imwrite('filename.jpeg', npimage)
    return 'filename.jpeg'
import gradio as gr

title = "JoJoGAN"
description = "Gradio Demo for JoJoGAN: One Shot Face Stylization. To use it, simply upload your image, or click one of the examples to load them. Read more at the links below."

demo = gr.Interface(
    inference,
    gr.Image(type="pil"),
    gr.Image(type="file"),
    title=title,
    description=description
)

demo.launch(share=True)
demo.integrate(wandb=wandb)
<gradio-app space="akhaliq/JoJoGAN"> <gradio-app>
import gradio as gr

def wandb_report(url):
    iframe = f'<iframe src={url} style="border:none;height:1024px;width:100%">'
    return gr.HTML(iframe)

with gr.Blocks() as demo:
    reporturl = 'https://wandb.ai/scott/pytorch-sweeps-demo/reports/loss-22-10-07-16-00-17---VmlldzoyNzU2NzAx'
    report = wandbreport(reporturl)

demo.launch(share=True)
Only one single reference image is needed for fine-tuning JoJoGAN which usually takes about 1 minute on a GPU in colab. After training, style can be applied to any input image. Read more in the paper.
W&B tracks experiments with just a few lines of code added to a colab and you can visualize, sort, and understand your experiments in a single, centralized dashboard.
Gradio, meanwhile, demos the model in a user friendly interface to share anywhere on the web.