
让我们来看看 Gradio 的一些最受欢迎的功能吧! 以下是 Gradio 的主要功能:
Let's go through some of the most popular features of Gradio! Here are Gradio's key features:
你可以提供用户可以轻松加载到 Interface 示例数据。 这有助于演示模型期望的输入类型,并提供一种结合模型探索数据集的方法。 要加载示例数据,你可以为界面构造函数的 examples= 关键字参数提供一个嵌套列表。 外部列表中的每个子列表代表一个数据样本,子列表中的每个元素代表每个输入组件的输入。 每个组件的示例数据格式在Docs中指定。
You can provide example data that a user can easily load into Interface. This can be helpful to demonstrate the types of inputs the model expects, as well as to provide a way to explore your dataset in conjunction with your model. To load example data, you can provide a nested list to the examples= keyword argument of the Interface constructor. Each sublist within the outer list represents a data sample, and each element within the sublist represents an input for each input component. The format of example data for each component is specified in the Docs.
import gradio as gr

def calculator(num1, operation, num2):
    if operation == "add":
        return num1 + num2
    elif operation == "subtract":
        return num1 - num2
    elif operation == "multiply":
        return num1 * num2
    elif operation == "divide":
        if num2 == 0:
            raise gr.Error("Cannot divide by zero!")
        return num1 / num2

demo = gr.Interface(
    calculator,
    [
        "number",
        gr.Radio(["add", "subtract", "multiply", "divide"]),
        "number"
    ],
    "number",
    examples=[
        [5, "add", 3],
        [4, "divide", 2],
        [-4, "multiply", 2.5],
        [0, "subtract", 1.2],
    ],
    title="Toy Calculator",
    description="Here's a sample toy calculator. Allows you to calculate things like $2+2=4$",
)
demo.launch()
你可以将大型数据集加载到示例中,以通过 Gradio 浏览数据集并与之交互。 这些示例将自动分页(你可以通过 Interface 的 examples_per_page 参数进行配置)。
You can load a large dataset into the examples to browse and interact with the dataset through Gradio. The examples will be automatically paginated (you can configure this through the examples_per_page argument of Interface).
继续了解更多示例指南中的示例。
Continue learning about examples in the More On Examples guide.
你希望将自定义错误消息传递给用户。 为此,引发 gr.Error("custom message") 以显示错误消息。 如果你尝试在上面的计算器演示中除以零,弹出模式将显示自定义错误消息。 在文档中了解有关错误的更多信息。
You wish to pass custom error messages to the user. To do so, raise a gr.Error("custom message") to display an error message. If you try to divide by zero in the calculator demo above, a popup modal will display the custom error message. Learn more about Error in the docs.
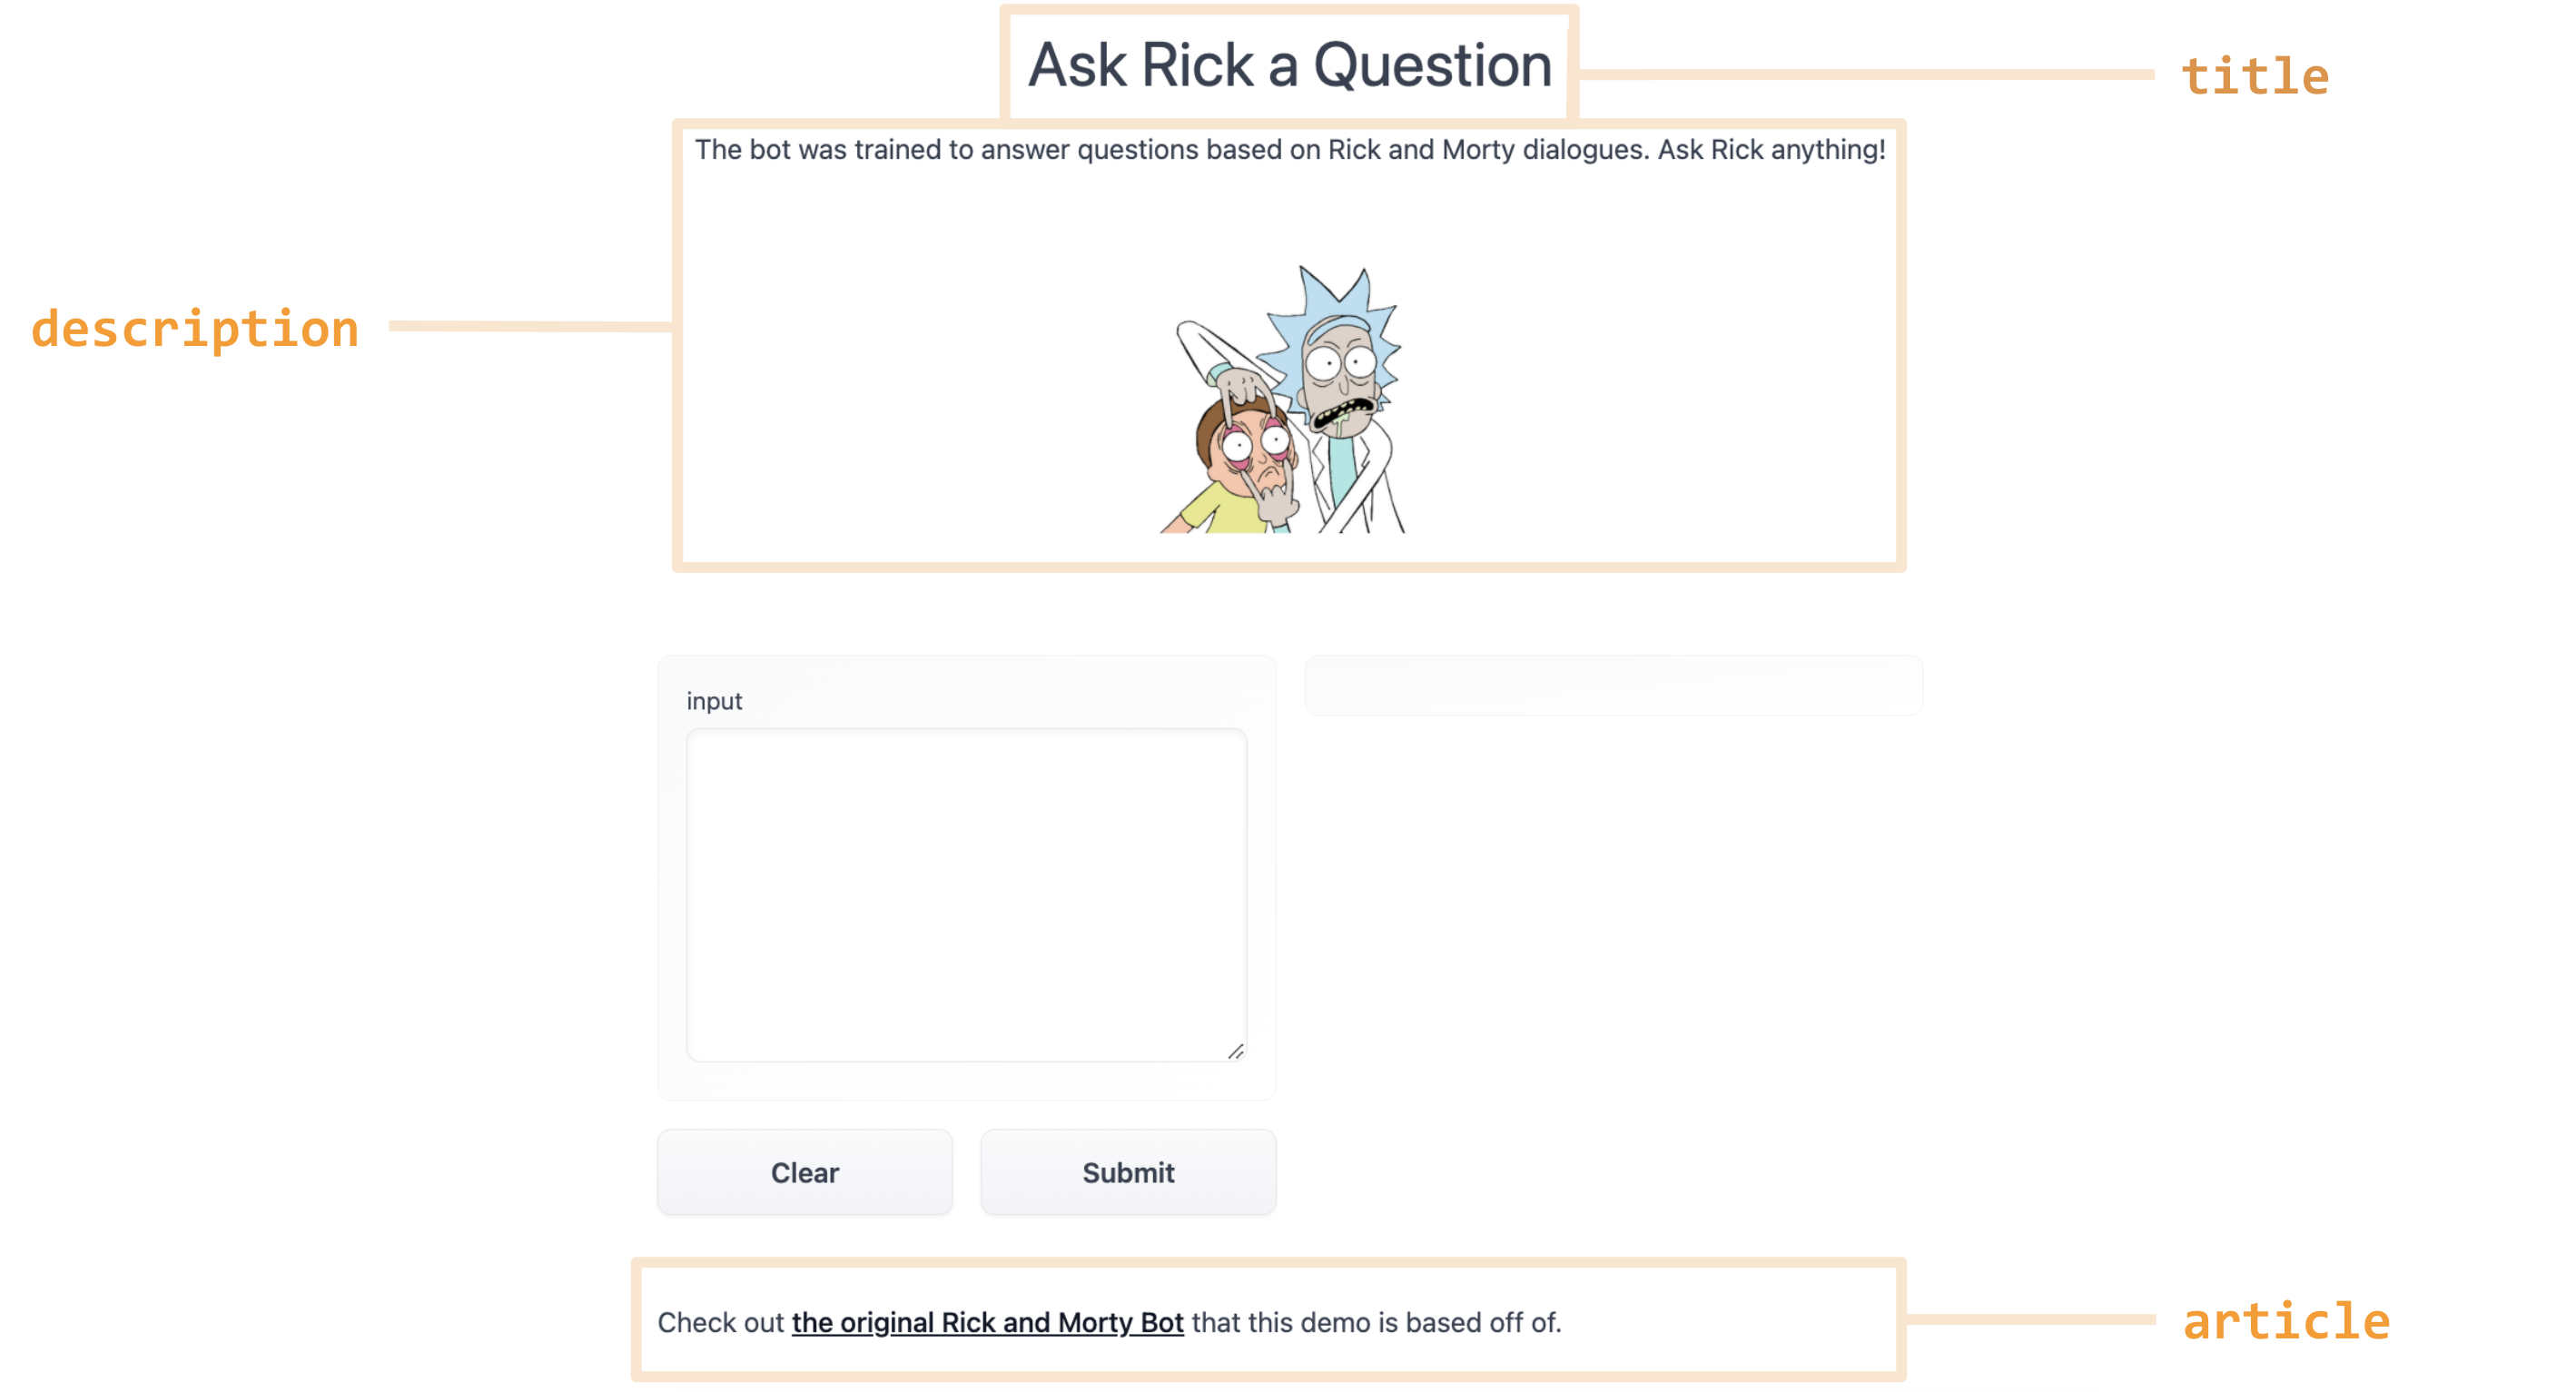
在前面的示例中,你可能已经注意到 Interface 构造函数中的 title= 和 description= 关键字参数可以帮助用户理解你的应用程序。
In the previous example, you may have noticed the title= and description= keyword arguments in the Interface constructor that helps users understand your app.
Interface 构造函数中有三个参数来指定此内容的去向:
There are three arguments in the Interface constructor to specify where this content should go:
title : 接受文本,可以显示在界面的最顶部,也成为页面标题。
title: which accepts text and can display it at the very top of interface, and also becomes the page title.
description :它接受文本、markdown 或 HTML 并将其放在标题的正下方。
description: which accepts text, markdown or HTML and places it right under the title.
article :它也接受文本、降价或 HTML 并将其放在界面下方。
article: which also accepts text, markdown or HTML and places it below the interface.
如果你改用 Blocks API,则可以使用 gr.Markdown(...) 或 gr.HTML(...) 组件在任何地方插入文本、markdown 或 HTML,并在 Component 构造函数中包含描述性内容。
If you're using the Blocks API instead, you can insert text, markdown, or HTML anywhere using the gr.Markdown(...) or gr.HTML(...) components, with descriptive content inside the Component constructor.
另一个有用的关键字参数是 label= ,它存在于每个 Component 中。 这会修改每个 Component 顶部的标签文本。 你还可以将 info= 关键字参数添加到 Textbox 或 Radio 等表单元素中,以提供有关其用法的更多信息。
Another useful keyword argument is label=, which is present in every Component. This modifies the label text at the top of each Component. You can also add the info= keyword argument to form elements like Textbox or Radio to provide further information on their usage.
gr.Number(label='Age', info='In years, must be greater than 0')
默认情况下, Interface 将具有“标记”按钮。 当测试你的 Interface 的用户看到带有有趣输出的输入时,例如错误或意外的模型行为,他们可以标记输入以供你查看。 在 Interface 构造函数的 flagging_dir= 参数提供的目录中,CSV 文件将记录标记的输入。 如果界面涉及文件数据,例如图像和音频组件,也会创建文件夹来存储那些标记的数据。
By default, an Interface will have "Flag" button. When a user testing your Interface sees input with interesting output, such as erroneous or unexpected model behaviour, they can flag the input for you to review. Within the directory provided by the flagging_dir= argument to the Interface constructor, a CSV file will log the flagged inputs. If the interface involves file data, such as for Image and Audio components, folders will be created to store those flagged data as well.
例如,对于上面显示的计算器界面,我们会将标记的数据存储在如下所示的标记目录中:
For example, with the calculator interface shown above, we would have the flagged data stored in the flagged directory shown below:
+-- calculator.py
+-- flagged/
|   +-- logs.csv
标记/logs.csv
flagged/logs.csv
num1,operation,num2,Output
5,add,7,12
6,subtract,1.5,4.5
使用前面显示的棕褐色界面,我们会将标记的数据存储在如下所示的标记目录中:
With the sepia interface shown earlier, we would have the flagged data stored in the flagged directory shown below:
+-- sepia.py
+-- flagged/
|   +-- logs.csv
|   +-- im/
|   |   +-- 0.png
|   |   +-- 1.png
|   +-- Output/
|   |   +-- 0.png
|   |   +-- 1.png
标记/logs.csv
flagged/logs.csv
im,Output
im/0.png,Output/0.png
im/1.png,Output/1.png
如果你希望用户提供标记的原因,你可以将字符串列表传递给界面的 flagging_options 参数。 用户在标记时必须选择其中一个字符串,该字符串将作为附加列保存到 CSV 中。
If you wish for the user to provide a reason for flagging, you can pass a list of strings to the flagging_options argument of Interface. Users will have to select one of the strings when flagging, which will be saved as an additional column to the CSV.

如你所见,Gradio 包含可以处理各种不同数据类型(例如图像、音频和视频)的组件。 大多数组件都可以用作输入或输出。
As you've seen, Gradio includes components that can handle a variety of different data types, such as images, audio, and video. Most components can be used both as inputs or outputs.
当组件用作输入时,Gradio 会自动处理将数据从用户浏览器发送的类型(例如网络摄像头快照的 base64 表示)转换为你的函数可以接受的形式(例如作为一个 numpy 数组)。
When a component is used as an input, Gradio automatically handles the preprocessing needed to convert the data from a type sent by the user's browser (such as a base64 representation of a webcam snapshot) to a form that can be accepted by your function (such as a numpy array).
同样,当组件用作输出时,Gradio 会自动处理将数据从函数返回的数据(例如图像路径列表)转换为可以在用户浏览器中显示的形式(例如作为 base64 格式的图片 Gallery )。
Similarly, when a component is used as an output, Gradio automatically handles the postprocessing needed to convert the data from what is returned by your function (such as a list of image paths) to a form that can be displayed in the user's browser (such as a Gallery of images in base64 format).
你可以在构建图像组件时使用参数控制预处理。 例如,这里如果你使用以下参数实例化 Image 组件,它会将图像转换为 PIL 类型并将其重塑为 (100, 100) ,而不管它提交的原始大小如何:
You can control the preprocessing using the parameters when constructing the image component. For example, here if you instantiate the Image component with the following parameters, it will convert the image to the PIL type and reshape it to be (100, 100) no matter the original size that it was submitted as:
img = gr.Image(shape=(100, 100), type="pil")
相反,这里我们保留图像的原始大小,但在将其转换为 numpy 数组之前反转颜色:
In contrast, here we keep the original size of the image, but invert the colors before converting it to a numpy array:
img = gr.Image(invert_colors=True, type="numpy")
后处理要容易得多! Gradio 会自动识别返回数据的格式(例如 Image 是 numpy 数组还是 str 文件路径?)并将其后处理为浏览器可以显示的格式。
Postprocessing is a lot easier! Gradio automatically recognizes the format of the returned data (e.g. is the Image a numpy array or a str filepath?) and postprocesses it into a format that can be displayed by the browser.
查看文档以了解每个组件的所有预处理相关参数。
Take a look at the Docs to see all the preprocessing-related parameters for each Component.
Gradio 主题是自定义应用程序外观的最简单方法。 你可以从各种主题中进行选择,也可以创建自己的主题。 为此,将 theme= kwarg 传递给 Interface 构造函数。 例如:
Gradio themes are the easiest way to customize the look and feel of your app. You can choose from a variety of themes, or create your own. To do so, pass the theme= kwarg to the Interface constructor. For example:
demo = gr.Interface(..., theme=gr.themes.Monochrome())
Gradio 带有一组预构建的主题,你可以从 gr.themes.* 加载这些主题。 你可以扩展这些主题或从头开始创建你自己的主题 - 有关更多详细信息,请参阅主题指南。
Gradio comes with a set of prebuilt themes which you can load from gr.themes.*. You can extend these themes or create your own themes from scratch - see the Theming guide for more details.
对于额外的样式功能,你可以使用 css= kwarg 将任何 CSS 传递到你的应用程序。 Gradio 应用程序的基类是 gradio-container ,下面是一个更改 Gradio 应用程序背景颜色的示例:
For additional styling ability, you can pass any CSS to your app using the css= kwarg.
The base class for the Gradio app is gradio-container, so here's an example that changes the background color of the Gradio app:
with gr.Interface(css=".gradio-container {background-color: red}") as demo:
    ...
一些组件可以通过 style() 方法额外设置样式。 例如:
Some components can be additionally styled through the style() method. For example:
img = gr.Image("lion.jpg").style(height='24', rounded=False)
查看文档以查看每个组件的所有样式选项。
Take a look at the Docs to see all the styling options for each Component.
如果你的应用预计流量较大,请使用 queue() 方法来控制处理速率。 这将使呼叫排队,因此一次只处理一定数量的请求。 排队使用 websockets,它也可以防止网络超时,因此如果你的函数的推理时间很长(> 1 分钟),你应该使用排队。
If your app expects heavy traffic, use the queue() method to control processing rate. This will queue up calls so only a certain number of requests are processed at a single time. Queueing uses websockets, which also prevent network timeouts, so you should use queueing if the inference time of your function is long (> 1min).
带 Interface :
With Interface:
demo = gr.Interface(...).queue()
demo.launch()
用 Blocks :
With Blocks:
with gr.Blocks() as demo:
    #...
demo.queue()
demo.launch()
你可以控制单次处理的请求数,如下所示:
You can control the number of requests processed at a single time as such:
demo.queue(concurrency_count=3)
请参阅有关配置其他排队参数的排队文档。
See the Docs on queueing on configuring other queuing parameters.
仅指定某些函数以在块中排队:
To specify only certain functions for queueing in Blocks:
with gr.Blocks() as demo2:
    num1 = gr.Number()
    num2 = gr.Number()
    output = gr.Number()
    gr.Button("Add").click(
        lambda a, b: a + b, [num1, num2], output)
    gr.Button("Multiply").click(
        lambda a, b: a * b, [num1, num2], output, queue=True)
demo2.launch()
在某些情况下,你可能希望流式传输一系列输出,而不是一次显示单个输出。 例如,你可能有一个图像生成模型,并且想要显示在每个步骤生成的图像,直至最终图像。 或者,你可能有一个聊天机器人,它一次传输一个单词的响应,而不是一次返回所有响应。
In some cases, you may want to stream a sequence of outputs rather than show a single output at once. For example, you might have an image generation model and you want to show the image that is generated at each step, leading up to the final image. Or you might have a chatbot which streams its response one word at a time instead of returning it all at once.
在这种情况下,你可以向 Gradio 提供生成器函数而不是常规函数。 在 Python 中创建生成器非常简单:函数应该 yield 一系列值而不是单个 return 值。 通常 yield 语句放在某种循环中。 下面是一个生成器的例子,它简单地计数到给定的数字:
In such cases, you can supply a generator function into Gradio instead of a regular function. Creating generators in Python is very simple: instead of a single return value, a function should yield a series of values instead. Usually the yield statement is put in some kind of loop. Here's an example of an generator that simply counts up to a given number:
def my_generator(x):
    for i in range(x):
        yield i
你可以像提供常规函数一样将生成器提供给 Gradio。 例如,这里有一个(假)图像生成模型,它在输出图像之前会在几个步骤中产生噪声:
You supply a generator into Gradio the same way as you would a regular function. For example, here's a a (fake) image generation model that generates noise for several steps before outputting an image:
import gradio as gr
import numpy as np
import time

# define core fn, which returns a generator {steps} times before returning the image
def fake_diffusion(steps):
    for _ in range(steps):
        time.sleep(1)
        image = np.random.random((600, 600, 3))
        yield image
    image = "https://gradio-builds.s3.amazonaws.com/diffusion_image/cute_dog.jpg"
    yield image


demo = gr.Interface(fake_diffusion, inputs=gr.Slider(1, 10, 3), outputs="image")

# define queue - required for generators
demo.queue()

demo.launch()
请注意,我们在迭代器中添加了 time.sleep(1) 以在步骤之间创建人为暂停,以便你能够观察迭代器的步骤(在真实图像生成模型中,这可能不是必需的).
Note that we've added a time.sleep(1) in the iterator to create an artificial pause between steps so that you are able to observe the steps of the iterator (in a real image generation model, this probably wouldn't be necessary).
将生成器提供给 Gradio需要你在底层界面或块中启用排队(请参阅上面的排队部分)。
Supplying a generator into Gradio requires you to enable queuing in the underlying Interface or Blocks (see the queuing section above).
Gradio 支持创建自定义进度条的功能,因此你可以自定义并控制向用户显示的进度更新。 为了启用此功能,只需向你的方法添加一个参数,该参数的默认值为 gr.Progress 实例。 然后,你可以通过使用介于 0 和 1 之间的浮点数直接调用此实例来更新进度级别,或者使用 Progress 实例的 tqdm() 方法来跟踪可迭代对象的进度,如下所示。 必须为进度更新启用队列。
Gradio supports the ability to create a custom Progress Bars so that you have customizability and control over the progress update that you show to the user. In order to enable this, simply add an argument to your method that has a default value of a gr.Progress instance. Then you can update the progress levels by calling this instance directly with a float between 0 and 1, or using the tqdm() method of the Progress instance to track progress over an iterable, as shown below. Queueing must be enabled for progress updates.
import gradio as gr
import time

def slowly_reverse(word, progress=gr.Progress()):
    progress(0, desc="Starting")
    time.sleep(1)
    progress(0.05)
    new_string = ""
    for letter in progress.tqdm(word, desc="Reversing"):
        time.sleep(0.25)
        new_string = letter + new_string
    return new_string

demo = gr.Interface(slowly_reverse, gr.Text(), gr.Text())

if __name__ == "__main__":
    demo.queue(concurrency_count=10).launch()
如果你使用 tqdm 库,你甚至可以通过将默认参数设置为 gr.Progress(track_tqdm=True) 来从函数中已经存在的任何 tqdm.tqdm 自动报告进度更新!
If you use the tqdm library, you can even report progress updates automatically from any tqdm.tqdm that already exists within your function by setting the default argument as gr.Progress(track_tqdm=True)!
Gradio 支持传递批处理函数的能力。 批处理函数只是接受输入列表并返回预测列表的函数。
Gradio supports the ability to pass batch functions. Batch functions are just functions which take in a list of inputs and return a list of predictions.
例如,这里有一个批处理函数,它接受两个输入列表(一个单词列表和一个整数列表),并返回一个修剪后的单词列表作为输出:
For example, here is a batched function that takes in two lists of inputs (a list of words and a list of ints), and returns a list of trimmed words as output:
import time

def trim_words(words, lens):
    trimmed_words = []
    time.sleep(5)
    for w, l in zip(words, lens):
        trimmed_words.append(w[:int(l)])
    return [trimmed_words]
使用批处理函数的好处是,如果启用队列,Gradio 服务器可以自动批处理传入请求并并行处理它们,从而有可能加快你的演示。 这是 Gradio 代码的样子(注意 batch=True 和 max_batch_size=16 这两个参数都可以传递到事件触发器或 Interface 类中)
The advantage of using batched functions is that if you enable queuing, the Gradio
server can automatically batch incoming requests and process them in parallel,
potentially speeding up your demo. Here's what the Gradio code looks like (notice
the batch=True and max_batch_size=16 -- both of these parameters can be passed
into event triggers or into the Interface class)
带 Interface :
With Interface:
demo = gr.Interface(trim_words, ["textbox", "number"], ["output"],
                    batch=True, max_batch_size=16)
demo.queue()
demo.launch()
用 Blocks :
With Blocks:
import gradio as gr

with gr.Blocks() as demo:
    with gr.Row():
        word = gr.Textbox(label="word")
        leng = gr.Number(label="leng")
        output = gr.Textbox(label="Output")
    with gr.Row():
        run = gr.Button()

    event = run.click(trim_words, [word, leng], output, batch=True, max_batch_size=16)

demo.queue()
demo.launch()
在上面的示例中,可以并行处理 16 个请求(总推理时间为 5 秒),而不是单独处理每个请求(总推理时间为 80 秒)。 许多 Hugging Face transformers 和 diffusers 模型在 Gradio 的批处理模式下工作得非常自然:这是一个使用漫射器批量生成图像的示例演示
In the example above, 16 requests could be processed in parallel (for a total inference
time of 5 seconds), instead of each request being processed separately (for a total
inference time of 80 seconds). Many Hugging Face transformers and diffusers models
work very naturally with Gradio's batch mode: here's an example demo using diffusers to
generate images in batches
注意:将批处理函数与 Gradio 一起使用需要你在底层界面或块中启用排队(请参阅上面的排队部分)。
Note: using batch functions with Gradio requires you to enable queuing in the underlying Interface or Blocks (see the queuing section above).
Gradio 能够在你运行 Python 的任何地方运行,包括本地 jupyter notebooks 以及协作 notebooks,例如Google Colab 。 对于本地 jupyter notebooks 和 Google Colab notbooks,Gradio 在本地服务器上运行,你可以在浏览器中与之交互。 (注意:对于 Google Colab,这是通过service worker tunneling完成的,这需要在浏览器中启用 cookie。)对于其他远程笔记本,Gradio 也会在服务器上运行,但你需要使用SSH 隧道来查看本地浏览器中的应用程序。 通常更简单的选择是使用 Gradio 的内置公共链接,将在下一个指南中讨论。
Gradio is able to run anywhere you run Python, including local jupyter notebooks as well as collaborative notebooks, such as Google Colab. In the case of local jupyter notebooks and Google Colab notbooks, Gradio runs on a local server which you can interact with in your browser. (Note: for Google Colab, this is accomplished by service worker tunneling, which requires cookies to be enabled in your browser.) For other remote notebooks, Gradio will also run on a server, but you will need to use SSH tunneling to view the app in your local browser. Often a simpler options is to use Gradio's built-in public links, discussed in the next Guide.