
相关空间:
相关空间: https://huggingface.co/spaces/gradio/calculator-flagging-crowdsourced,https : //huggingface.co/spaces/gradio/calculator-flagging-options,https : //huggingface.co/spaces/gradio /calculator-flag-basic标签:标记,数据
演示机器学习模型时,你可能希望从试用该模型的用户那里收集数据,尤其是模型未按预期运行的数据点。 捕获这些“硬”数据点很有价值,因为它可以让你改进机器学习模型并使其更加可靠和健壮。
When you demo a machine learning model, you might want to collect data from users who try the model, particularly data points in which the model is not behaving as expected. Capturing these "hard" data points is valuable because it allows you to improve your machine learning model and make it more reliable and robust.
Gradio 通过在每个 Interface 中包含一个Flag按钮来简化此数据的收集。 这允许用户或测试人员轻松地将数据发送回运行演示的机器。 在本指南中,我们将更多地讨论如何使用 gradio.Interface 和 gradio.Blocks 的标记功能。
Gradio simplifies the collection of this data by including a Flag button with every Interface. This allows a user or tester to easily send data back to the machine where the demo is running. In this Guide, we discuss more about how to use the flagging feature, both with gradio.Interface as well as with gradio.Blocks.
gradio.Interface 中的标记按钮使用 Gradio 的 Interface 标记特别容易。 默认情况下,在输出组件下方,有一个标记为Flag的按钮。 当测试你的模型的用户看到带有有趣输出的输入时,他们可以单击标志按钮将输入和输出数据发送回运行演示的机器。 示例保存到 CSV 日志文件(默认情况下)。 如果演示涉及图像、音频、视频或其他类型的文件,则将这些文件单独保存在并行目录中,并将这些文件的路径保存在 CSV 文件中。
Flagging with Gradio's Interface is especially easy. By default, underneath the output components, there is a button marked Flag. When a user testing your model sees input with interesting output, they can click the flag button to send the input and output data back to the machine where the demo is running. The sample is saved to a CSV log file (by default). If the demo involves images, audio, video, or other types of files, these are saved separately in a parallel directory and the paths to these files are saved in the CSV file.
gradio.Interface 中有四个参数控制标记的工作方式。 我们将更详细地讨论它们。
There are four parameters in gradio.Interface that control how flagging works. We will go over them in greater detail.
allow_flagging :此参数可以设置为 "manual" (默认)、 "auto" 或 "never" 。
allow_flagging: this parameter can be set to either "manual" (default), "auto", or "never".
manual: users will see a button to flag, and samples are only flagged when the button is clicked.manual :用户将看到一个标记按钮,只有在单击该按钮时才会标记样本。
auto: users will not see a button to flag, but every sample will be flagged automatically.auto :用户不会看到标记按钮,但每个样本都会被自动标记。
never: users will not see a button to flag, and no sample will be flagged.never :用户不会看到要标记的按钮,也不会标记任何样本。
flagging_options :此参数可以是 None (默认)或字符串列表。
flagging_options: this parameter can be either None (default) or a list of strings.
None, then the user simply clicks on the Flag button and no additional options are shown.如果为 None ,则用户只需单击Flag按钮,不会显示其他选项。
["Incorrect", "Ambiguous"], then buttons labeled Flag as Incorrect and Flag as Ambiguous appear. This only applies if allow_flagging is "manual".如果提供了字符串列表,则用户会看到几个按钮,对应于提供的每个字符串。 例如,如果此参数的值为 ["Incorrect", "Ambiguous"] ,则会出现标记为Flag as Incorrect和Flag as Ambiguous 的按钮。 这仅适用于 allow_flagging 为 "manual" 的情况。
然后将所选选项与输入和输出一起记录下来。
flagging_dir :此参数采用字符串。
flagging_dir: this parameter takes a string.
它表示存储标记数据的目录的名称。
flagging_callback :此参数采用 FlaggingCallback 类的子类的实例
flagging_callback: this parameter takes an instance of a subclass of the FlaggingCallback class
使用此参数允许你编写在单击标志按钮时运行的自定义代码
gr.CSVLogger默认情况下,这被设置为 gr.CSVLogger 的一个实例
gr.HuggingFaceDatasetSaver which can allow you to pipe any flagged data into a HuggingFace Dataset. (See more below.)一个示例是将其设置为 gr.HuggingFaceDatasetSaver 的一个实例,它允许你将任何标记的数据通过管道传输到 HuggingFace 数据集中。 (详见下文。)
在 flagging_dir 参数提供的目录中,CSV 文件将记录标记的数据。
Within the directory provided by the flagging_dir argument, a CSV file will log the flagged data.
这是一个示例:下面的代码创建了嵌入在其下方的计算器界面:
Here's an example: The code below creates the calculator interface embedded below it:
import gradio as gr

def calculator(num1, operation, num2):
    if operation == "add":
        return num1 + num2
    elif operation == "subtract":
        return num1 - num2
    elif operation == "multiply":
        return num1 * num2
    elif operation == "divide":
        return num1 / num2

iface = gr.Interface(
    calculator,
    ["number", gr.Radio(["add", "subtract", "multiply", "divide"]), "number"],
    "number",
    allow_flagging="manual"
)

iface.launch()
当你单击上面的标记按钮时,启动界面的目录将包含一个新标记的子文件夹,其中包含一个 csv 文件。 此 csv 文件包含所有已标记的数据。
When you click the flag button above, the directory where the interface was launched will include a new flagged subfolder, with a csv file inside it. This csv file includes all the data that was flagged.
+-- flagged/
|   +-- logs.csv
_ 标记/logs.csv_
flagged/logs.csv
num1,operation,num2,Output,timestamp
5,add,7,12,2022-01-31 11:40:51.093412
6,subtract,1.5,4.5,2022-01-31 03:25:32.023542
如果界面涉及文件数据,例如图像和音频组件,也会创建文件夹来存储那些标记的数据。 例如, image 输入到 image 输出界面将创建以下结构。
If the interface involves file data, such as for Image and Audio components, folders will be created to store those flagged data as well. For example an image input to image output interface will create the following structure.
+-- flagged/
|   +-- logs.csv
|   +-- image/
|   |   +-- 0.png
|   |   +-- 1.png
|   +-- Output/
|   |   +-- 0.png
|   |   +-- 1.png
_ 标记/logs.csv_
flagged/logs.csv
im,Output timestamp
im/0.png,Output/0.png,2022-02-04 19:49:58.026963
im/1.png,Output/1.png,2022-02-02 10:40:51.093412
如果你希望用户提供标记的原因,你可以将字符串列表传递给界面的 flagging_options 参数。 用户在标记时必须选择这些选项之一,该选项将作为附加列保存到 CSV 中。
If you wish for the user to provide a reason for flagging, you can pass a list of strings to the flagging_options argument of Interface. Users will have to select one of these choices when flagging, and the option will be saved as an additional column to the CSV.
如果我们回到计算器示例,以下代码将创建嵌入在其下方的界面。
If we go back to the calculator example, the following code will create the interface embedded below it.
iface = gr.Interface(
    calculator,
    ["number", gr.Radio(["add", "subtract", "multiply", "divide"]), "number"],
    "number",
    allow_flagging="manual",
    flagging_options=["wrong sign", "off by one", "other"]
)

iface.launch()
当用户单击标志按钮时,csv 文件现在将包含一个列,指示所选选项。
When users click the flag button, the csv file will now include a column indicating the selected option.
_ 标记/logs.csv_
flagged/logs.csv
num1,operation,num2,Output,flag,timestamp
5,add,7,-12,wrong sign,2022-02-04 11:40:51.093412
6,subtract,1.5,3.5,off by one,2022-02-04 11:42:32.062512
有时,将数据保存到本地 CSV 文件没有意义。 例如,在 Hugging Face Spaces 上,开发人员通常无法访问托管 Gradio 演示的底层临时机器。 这就是为什么在 Hugging Face Space 中默认关闭标记的原因。 但是,你可能想对标记的数据执行其他操作。
Sometimes, saving the data to a local CSV file doesn't make sense. For example, on Hugging Face Spaces, developers typically don't have access to the underlying ephemeral machine hosting the Gradio demo. That's why, by default, flagging is turned off in Hugging Face Space. However, you may want to do something else with the flagged data.
我们使用 flagging_callback 参数让这一切变得超级简单。
We've made this super easy with the flagging_callback parameter.
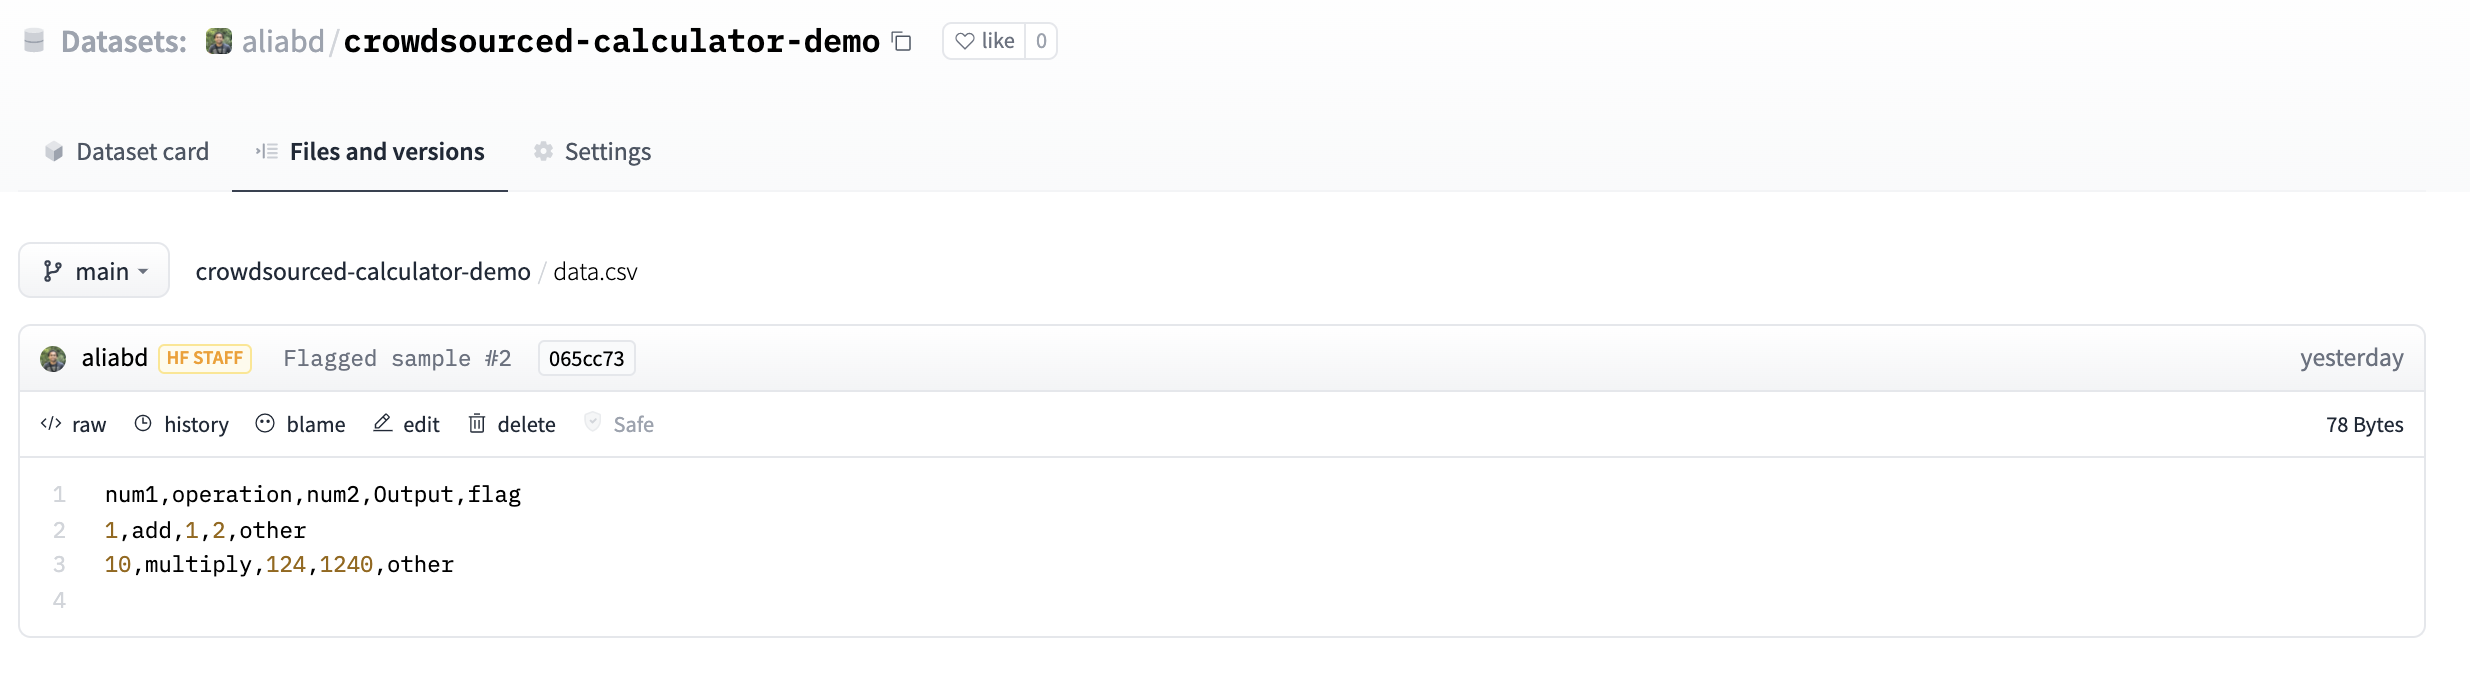
例如,下面我们将从我们的计算器示例中将标记的数据通过管道传输到拥抱面部数据集中,例如这样我们就可以构建一个“众包”数据集:
For example, below we're going to pipe flagged data from our calculator example into a Hugging Face Dataset, e.g. so that we can build a "crowd-sourced" dataset:
import os

HF_TOKEN = os.getenv('HF_TOKEN')
hf_writer = gr.HuggingFaceDatasetSaver(HF_TOKEN, "crowdsourced-calculator-demo")

iface = gr.Interface(
    calculator,
    ["number", gr.Radio(["add", "subtract", "multiply", "divide"]), "number"],
    "number",
    description="Check out the crowd-sourced dataset at: [https://huggingface.co/datasets/aliabd/crowdsourced-calculator-demo](https://huggingface.co/datasets/aliabd/crowdsourced-calculator-demo)",
    allow_flagging="manual",
    flagging_options=["wrong sign", "off by one", "other"],
    flagging_callback=hf_writer
)

iface.launch()
请注意,我们定义了自己的 gradio.HuggingFaceDatasetSaver 实例,使用我们的 Hugging Face 令牌和我们想要将样本保存到的数据集的名称。 此外,我们还设置了 allow_flagging="manual" 因为在 Hugging Face Spaces 上, allow_flagging 默认设置为 "never" 。 这是我们的演示:
Notice that we define our own
instance of gradio.HuggingFaceDatasetSaver using our Hugging Face token and
the name of a dataset we'd like to save samples to. In addition, we also set allow_flagging="manual"
because on Hugging Face Spaces, allow_flagging is set to "never" by default. Here's our demo:
你现在可以在这个公开的 Hugging Face 数据集中看到上面标记的所有示例。
You can now see all the examples flagged above in this public Hugging Face dataset.
我们创建了 gradio.HuggingFaceDatasetSaver 类,但你可以传递自己的自定义类,只要它继承自此文件中定义的 FLaggingCallback 即可。 如果你创建了一个很酷的回调,请将它贡献给 repo!
We created the gradio.HuggingFaceDatasetSaver class, but you can pass your own custom class as long as it inherits from FLaggingCallback defined in this file. If you create a cool callback, contribute it to the repo!
如果你使用 gradio.Blocks 怎么办? 一方面,你可以使用 Blocks 获得更大的灵活性——你可以编写任何想要在单击按钮时运行的 Python 代码,并使用 Blocks 中的内置事件对其进行分配。
What about if you are using gradio.Blocks? On one hand, you have even more flexibility
with Blocks -- you can write whatever Python code you want to run when a button is clicked,
and assign that using the built-in events in Blocks.
同时,你可能希望使用现有的 FlaggingCallback 来避免编写额外的代码。 这需要两个步骤:
At the same time, you might want to use an existing FlaggingCallback to avoid writing extra code.
This requires two steps:
在第一次标记数据之前,你必须在代码中的某处运行回调的 .setup()
You have to run your callback's .setup() somewhere in the code prior to the
first time you flag data
单击标记按钮时,将触发回调的 .flag() 方法,确保正确收集参数并禁用典型的预处理。
When the flagging button is clicked, then you trigger the callback's .flag() method,
making sure to collect the arguments correctly and disabling the typical preprocessing.
这是一个带有图像棕褐色过滤器 Blocks 演示的示例,它允许你使用默认的 CSVLogger 标记数据:
Here is an example with an image sepia filter Blocks demo that lets you flag
data using the default CSVLogger:
import numpy as np
import gradio as gr

def sepia(input_img, strength):
    sepia_filter = strength * np.array(
        [[0.393, 0.769, 0.189], [0.349, 0.686, 0.168], [0.272, 0.534, 0.131]]
    ) + (1-strength) * np.identity(3)
    sepia_img = input_img.dot(sepia_filter.T)
    sepia_img /= sepia_img.max()
    return sepia_img

callback = gr.CSVLogger()

with gr.Blocks() as demo:
    with gr.Row():
        with gr.Column():
            img_input = gr.Image()
            strength = gr.Slider(0, 1, 0.5)
        img_output = gr.Image()
    with gr.Row():
        btn = gr.Button("Flag")

    # This needs to be called at some point prior to the first call to callback.flag()
    callback.setup([img_input, strength, img_output], "flagged_data_points")

    img_input.change(sepia, [img_input, strength], img_output)
    strength.change(sepia, [img_input, strength], img_output)

    # We can choose which components to flag -- in this case, we'll flag all of them
    btn.click(lambda *args: callback.flag(args), [img_input, strength, img_output], None, preprocess=False)

demo.launch()
重要说明:请确保你的用户了解他们提交的数据何时被保存,以及你打算如何处理这些数据。 这在你使用 allow_flagging=auto 时尤其重要(当通过演示提交的所有数据都被标记时)
Important Note: please make sure your users understand when the data they submit is being saved, and what you plan on doing with it. This is especially important when you use allow_flagging=auto (when all of the data submitted through the demo is being flagged)